Fortinet FortiGate IPsec Configuration
Prerequisites
- FortiGate installation
- Ecosystem set up with proper security policies
Create Gateway for IPsec
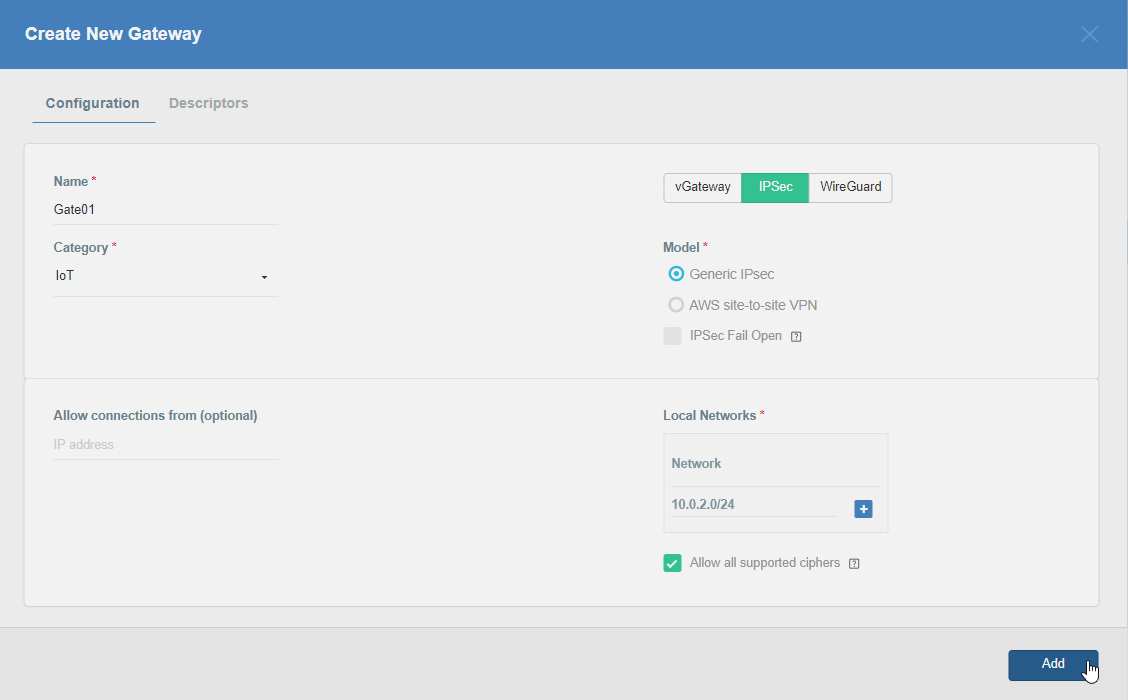
Firstly, you will need to create a new Gateway device in the Acreto platform. Instructions on how to create a new Gateway are available here.
- Name: IPsec connection name must meet the same requirements as the Strongswan connection name (letters and numbers only).
- Category: IoT
- Type: IPsec
- Allow connection from: Empty (describes the source IP address where the IPsec connection will be permitted).
- Local Networks: any local network addresses that will be routed through this gateway.
Info
To simplify testing, add the IP addresses of all interfaces connected to your gateway as Local Networks (you can use /32 prefix for public interface). This will allow you to test connectivity from the gateway through Acreto by using Ping, Traceroute, or similar tools.
How-To
Step 1: Read IPsec Gateway Values Required for FortiGate Configuration
To proceed with the FortiGate configuration, you will need a few values from an existing committed Acreto Gateway:
- Gateway Address
- Pre-Shared Key
- Recommended Ciphers
All of these may be found within the Gateway details panel - view the below animation for further instruction.
Animation how to get required values from Gateway [▶]
Step 2: Configure FortiGate - VPN Creation Wizard
Use VPN Wizard to create all basic configurations.
- Log in to the FortiGate Dashboard.
- In the navigation panel, select VPN > IPsec Wizard and view VPN Creation Wizard
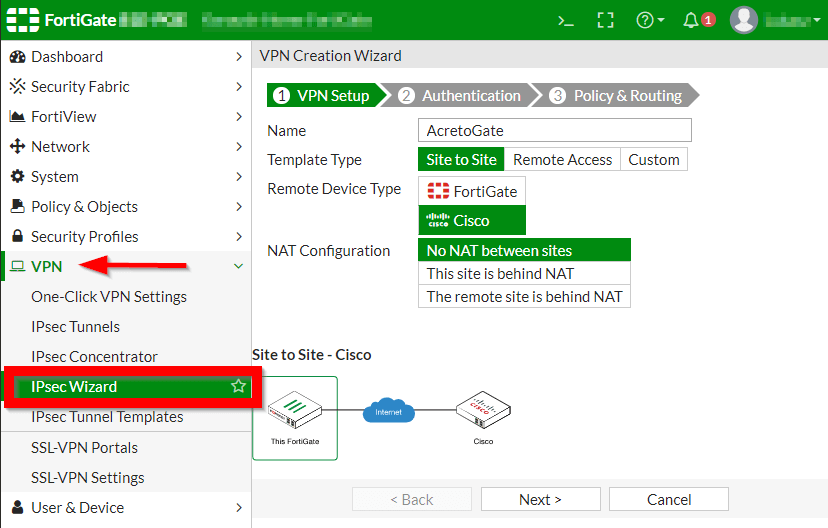
- Complete the first step of VPN Wizard, VPN Setup, by inserting these values:
- Name: AcretoGate (or your own readable name)
- Template Type: Site to Site
- Remote Device Type: Cisco
- NAT Configuration: No NAT between sites
- When the form is ready, click Next.
- Complete the second step of the VPN wizard, Authentication.
- Remote Device: IP address
- IP Address: Input the IP address of your Acreto Gateway created in Wedge.
- Outgoing Interface: Select the existing interface that will be used for this connection.
- Authentication Method: Pre-shared Key
- Pre-shared Key: Enter the Pre-shared Key common for Acreto and FortiGate (available on Acreto Wedge in the Gate configuration panel).
- When the form is ready, click Next.
- Complete the last step of the VPN wizard, Policy & Routing.
- Local Interface: Select the local interface that will use this connection.
- Local Subnets: Define local subnets for this connection.
- Remote Subnets: Define remote (Acreto site) subnets for this connection (0.0.0.0/0 - for all networks).
- Internet Access: None
- Click on Save.
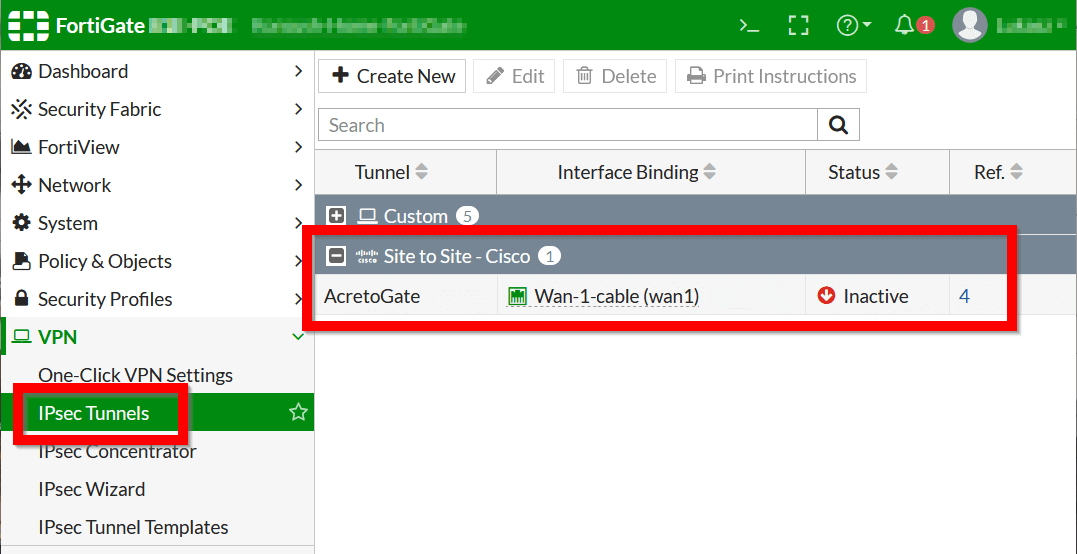
- From the side menu, choose VPN > IPsec Tunnels to confirm that the newly created VPN is displayed on the list in the Site to Site section.
Step 3: Configure FortiGate - Convert VPN to Custom Tunnel
- From the side menu, choose VPN > IPsec Tunnels. You should see the Acreto Gate tunnel created in the previous step.
- Double-Click on the tunnel name to open editing options.
- On the Edit VPN tunnel screen, click Convert To Custom Tunnel- this action will convert your VPN to a custom tunnel, allowing you to configure additional settings.
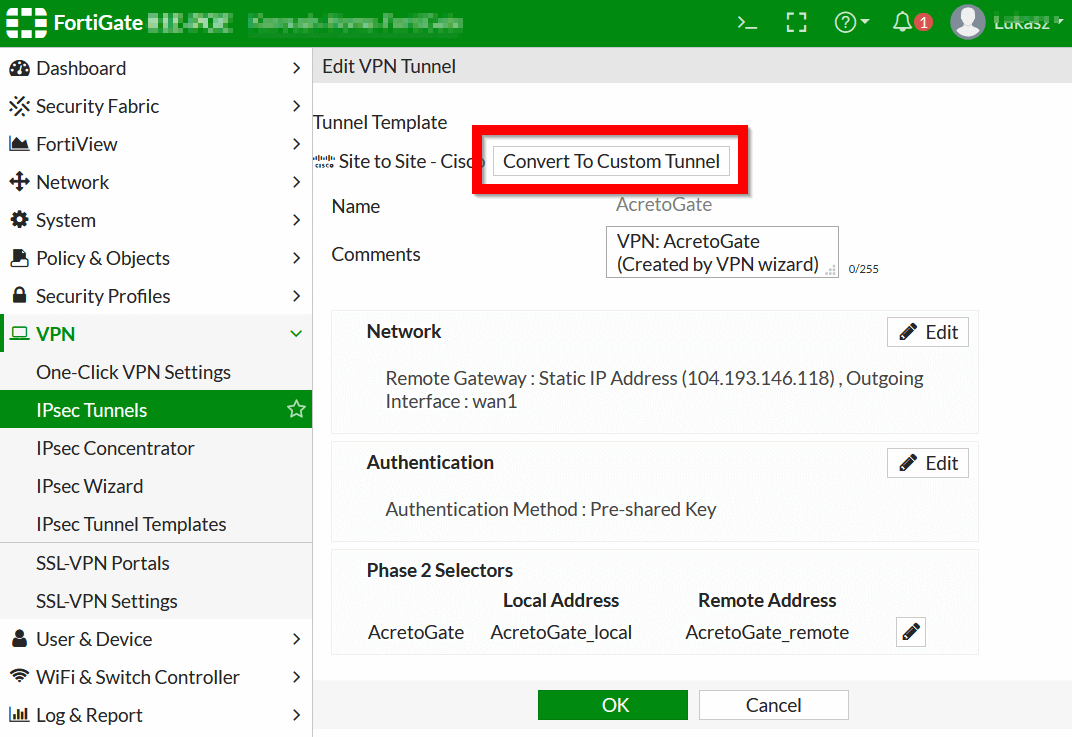
- After you click on Convert To Custom Tunnel, a few additional options will be displayed on the screen.
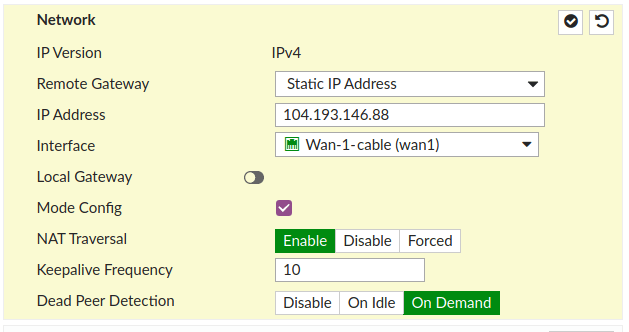
- Edit Network by clicking on Edit and set the Mode Config to check, as shown on the screen below (IP address and Interface will be different).
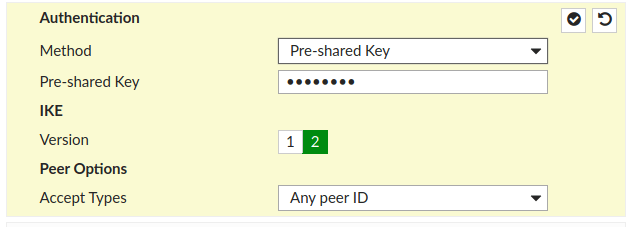
- Edit Authentication by clicking on Edit and set Version to 2, as shown on the screen below.
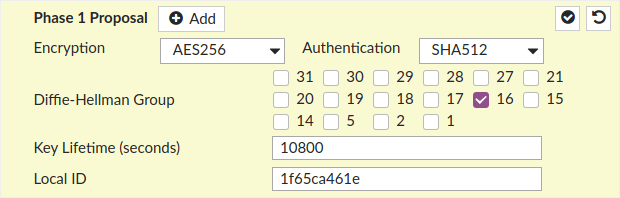
- Edit Phase 1 Proposal by clicking on Edit and set Version to 2, as shown on the screen below.
- Encryption: AES256
- Authentication: SHA512
- Diffie-Hellman Group: 16
- Key Lifetime: 3600
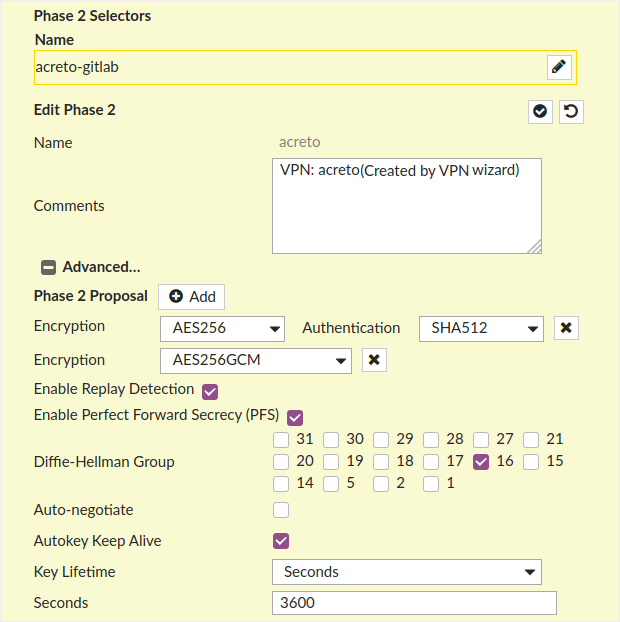
- Edit Phase 2 Selectors by clicking on Edit > Advanced, as shown on the screen below:
- Encryption: AES256
- Authentication: SHA512
- Enable Replay Detection: check
- Enable Perfect Forward Secrecy (PFS): check
- Diffie-Hellman Group: 16
- Autokey Keep Alive: check
- Key Lifetime: Seconds
- Seconds: 3600
- When all edits are complete, click OK at the bottom of the screen to convert the tunnel. From now on, the IPsec tunnels panel will show as Custom.
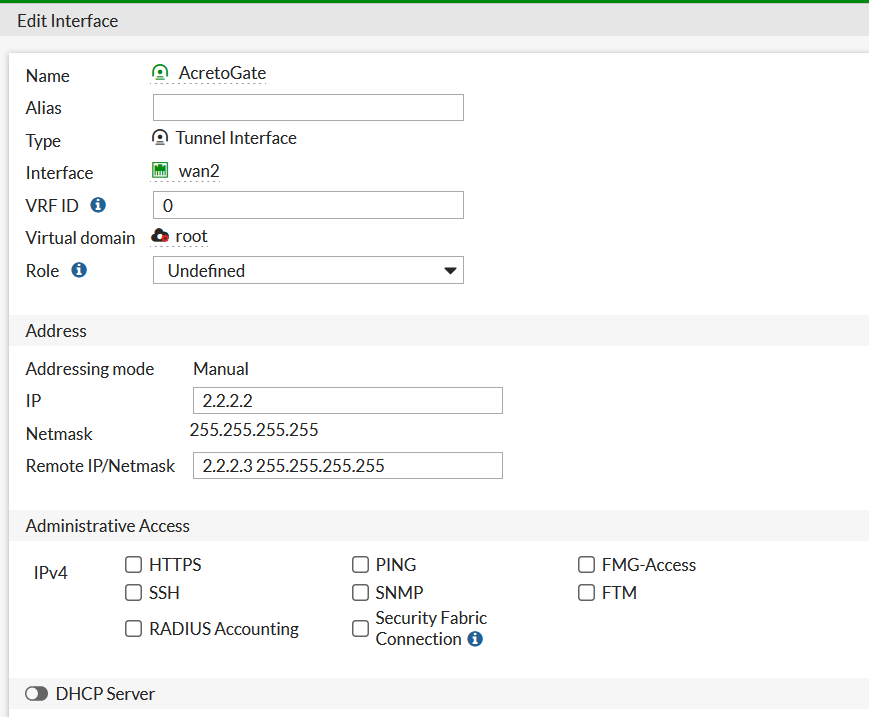
Step 4: Configure FortiGate - Assign IP to the tunnel interface
- From the side menu, choose Network > Interfaces. Find the tunnel interface name AcretoGate under WAN interface.
- Edit the interface and assign local and remote IP. You can choose any IP, it will not affect the traffic.
- IP: <any /32 IP>
- Netmask: 255.255.255.255
- Remote IP/Netmask: <any /32 IP>
Step 5: Configure FortiGate - Routing Changes
- From the side menu, choose Network > Static Routes. Find the static route created by the wizard. Should be with the name
<Tunnel_name>_remote. - Edit the static route and change the Administrative Distance to 50.
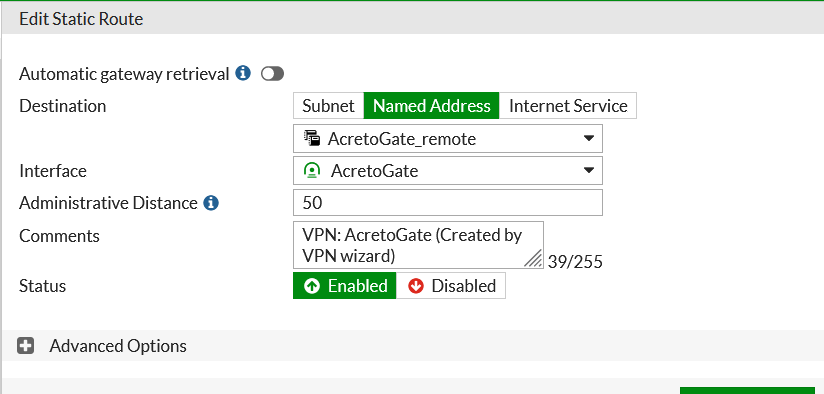
- Click OK to save the route.
- From the side menu choose Network > Policy Routes and click on Create New
- Configure the new Policy Route, as shown on the screen below.
- Incoming Interface: <select your local interface>
- Source Address-Ip/Netmask : <enter local subnet >
- Destination Address-Ip/Netmask : 0.0.0.0/0
- Action : Forward Traffic
- Outgoing Interface : AcretoGate OR <choose your tunnel interface>
- Gateway Address : <enter Remote IP configured in Step 4.2.3>
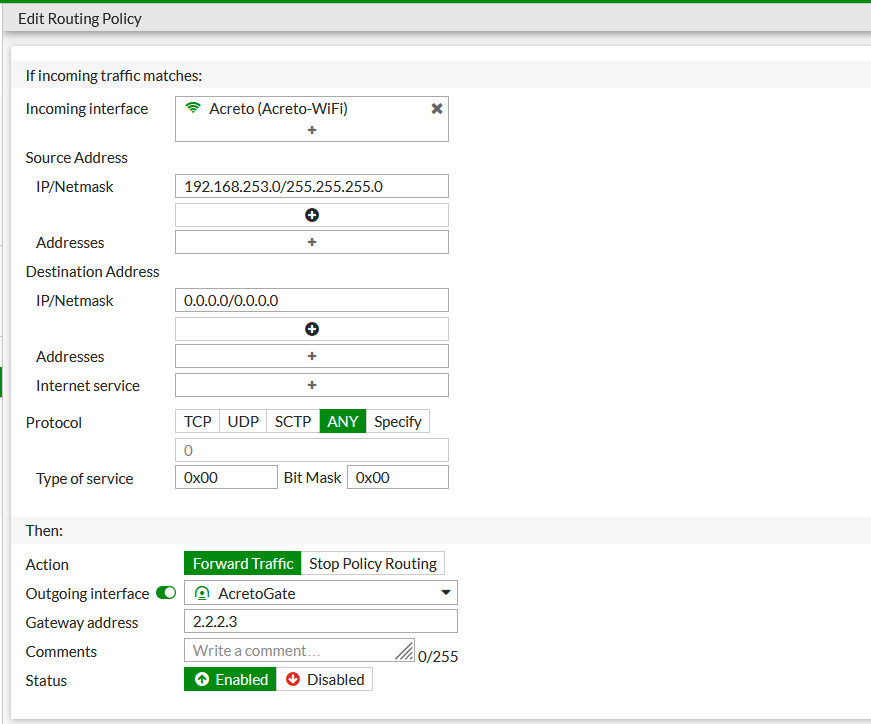
- Click OK to Save
Step 6: Configure FortiGate - Bring the Tunnel Up
- From the side menu, choose Dashboard > Network > IPsec
- Select the Tunnel and click on Bring Up.
Step 7: Configure FortiGate - Verify
When the configuration is complete, all network traffic on the selected interface and the selected subnet(s) is redirected through Acreto.