Fortinet FortiGate IPsec Configuration through CLI
Before you start
Overview
This article will show you how to use CLI to connect the FortiGate managed network to the Acreto Ecosystem.
Prerequisites
- FortiGate installation
- Ecosystem set up with proper security policies
How-To
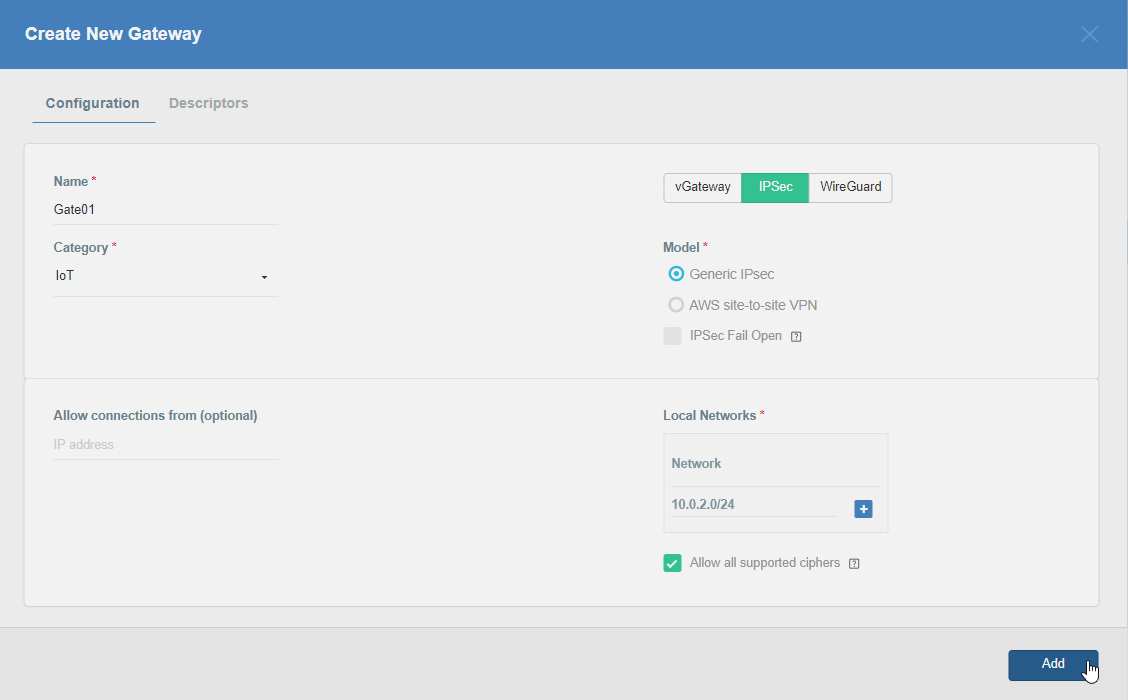
Create Gateway for IPsec
This step is optional, skip it if you already own the Gateway.
Firstly, you will need to create a new Gateway device in the Acreto platform. Instructions on how to create a new Gateway are available here.
- Name: IPsec connection name must meet the same requirements as the Strongswan connection name (letters and numbers only).
- Category: IoT
- Type: IPsec
- Allow connection from: Empty (describes the source IP address where the IPsec connection will be permitted).
- Local Networks: any local network addresses that will be routed
through this gateway.
Info
To simplify testing, add the IP addresses of all interfaces connected to your gateway as Local Networks (you can use /32 prefix for public interface). This will allow you to test connectivity from the gateway through Acreto by using Ping, Traceroute, or similar tools.
Step 1: Read IPsec Gateway Values Required for Fortigate Configuration
To proceed with the Fortigate configuration, you will need a few values from an existing committed Acreto Gateway:
- Gateway Address
- Pre-Shared Key
- Recommended Ciphers
All of these may be found within the Gateway details panel - view the below animation for further instruction.
Animation how to get required values from Gateway [▶]
Step 2: Configure Fortigate - Create VPN (Phase1 and Phase2)
Use the following commands to create a VPN through CLI.
Log in to the Fortigate CLI.
-
Configure IPsec VPN Phase-1
-
Configure IPsec VPN Phase-2
Step 3: Configure Fortigate - Create Address and Address group
-
Create addresses for all local addresses/subnets
-
Create an address group to add all the addresses created in the previous step
Step 4: Configure Fortigate - Create Firewall Policy for Traffic
-
Outbound Policy for traffic originating from Local lan interface to internet through Acreto VPN
-
Inbound Policy for traffic coming from Acreto VPN to Local lan
Step 5: Configure Fortigate - Routing Changes
Scenario 1: When traffic from all local subnet/interfaces need to pass through the tunnel
-
Add Static Route
Scenario 2: When traffic from a specific subnet/interface needs to pass through the tunnel.
-
Add IP at the tunnel interface
-
Add Static Route to direct the traffic through the tunnel with a higher administrative distance
-
Add Policy Route to direct the specific traffic through the tunnel
Step 6: Configure Fortigate - Bring the Tunnel Up
Run the following command to bring the tunnel up bash diagnose vpn tunnel up AcretoGate
Step 7: Configure Fortigate - Verify
- Check the status of tunnel Phase-1
- Check status of Phase-2
Summary
Once the VPN connection is successfully established, all the internet traffic will be routed through Acreto.