Subsections of End User Documentation
Acreto Connect Client
About Acreto Connect Client
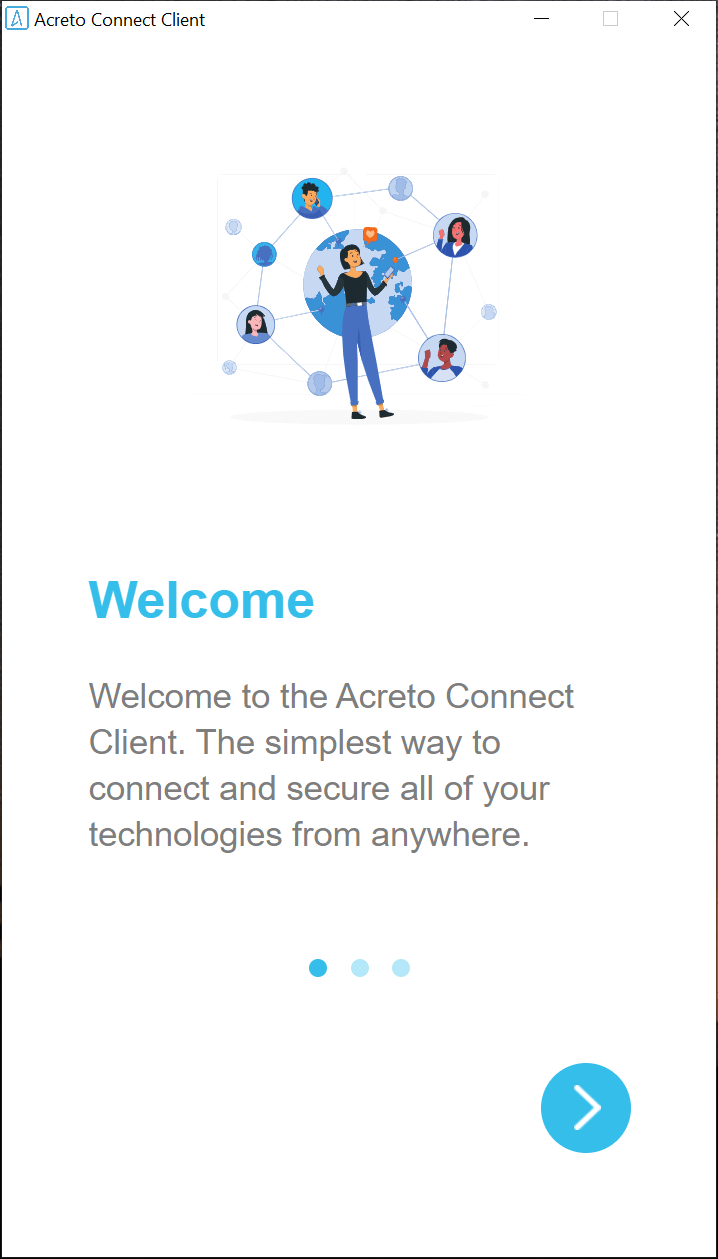
Acreto Connect Client is a simple application that allows to connect your device to Acreto Ecosystem. It is available on Windows, macOS, Android and iOS.
This client application securely connects and protects remote users, developers, and 3rd party vendors with the Acreto cloud platform. A lightweight client that enables remote users to securely work from anywhere. The client application, when utilized with the Acreto platform, enables both encryption and in-line security to ensure that malicious files and attacks are prevented and removed.
Tip
Do not use any other VPN Clients when ACC is connected
Please avoid using any other VPN clients when the Acreto Connect Client (ACC) is connected. Running multiple VPN clients simultaneously can cause network conflicts, connectivity issues, and may compromise security. To ensure optimal performance and a secure connection, disconnect any other VPN services before connecting with ACC.
Table of Contents
Subsections of Acreto Connect Client
Download Acreto Connect Client
Acreto Connect Client is a simple application that allows to connect your device to Acreto Ecosystem. It is available on Windows, macOS, Android and iOS.
Download
To download Acreto Connect Client go to product page: https://acc.acreto.io
See also
Import Profile and Establish Connection
Getting started
The first step after installation is the profile import. The profile contains information about the Ecosystem you can connect to.
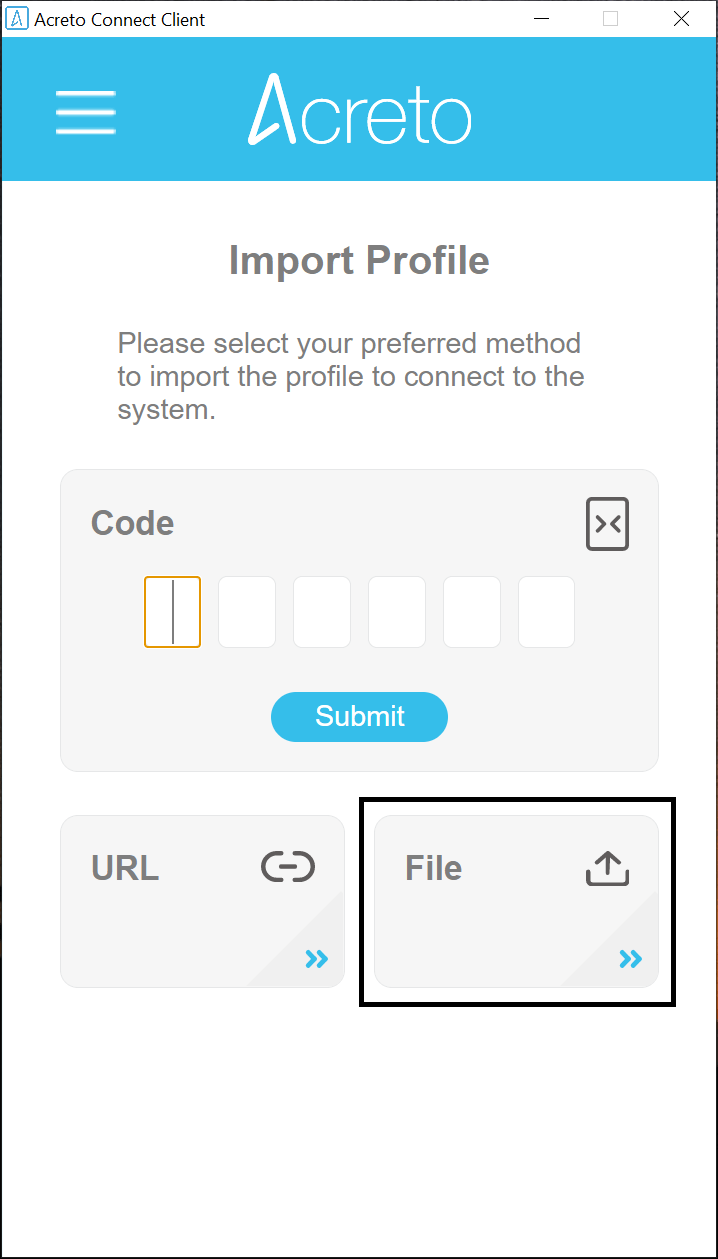
You may use one of three methods to import the profile:
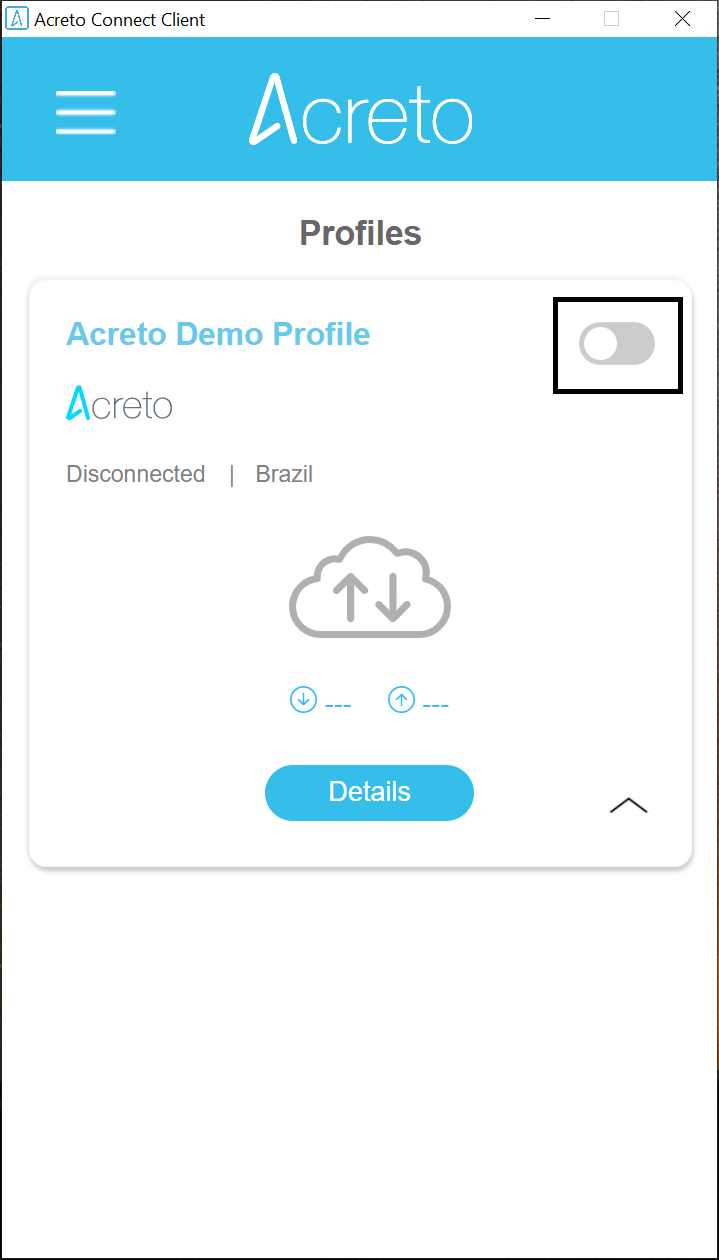
After your profile is imported make sure that you established the connection
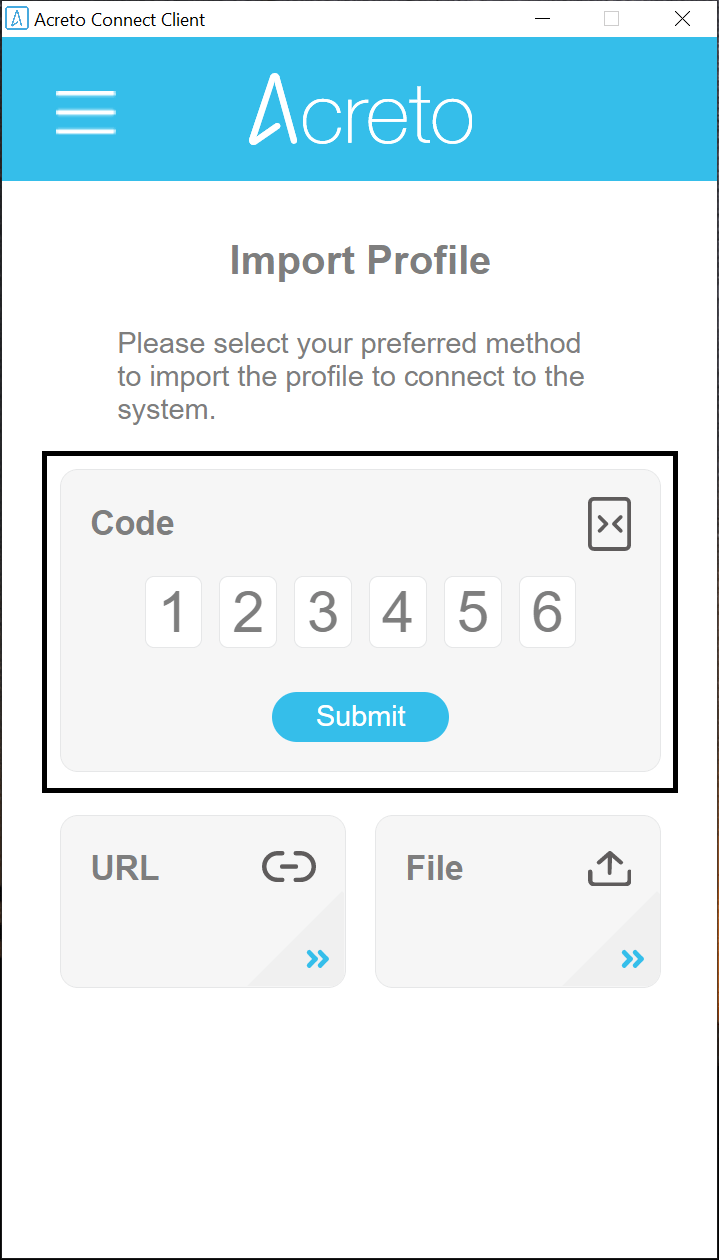
Import Profile from code
- Under the Code option, enter the 6 digit code provided by your system administrator and then click on the button Submit:
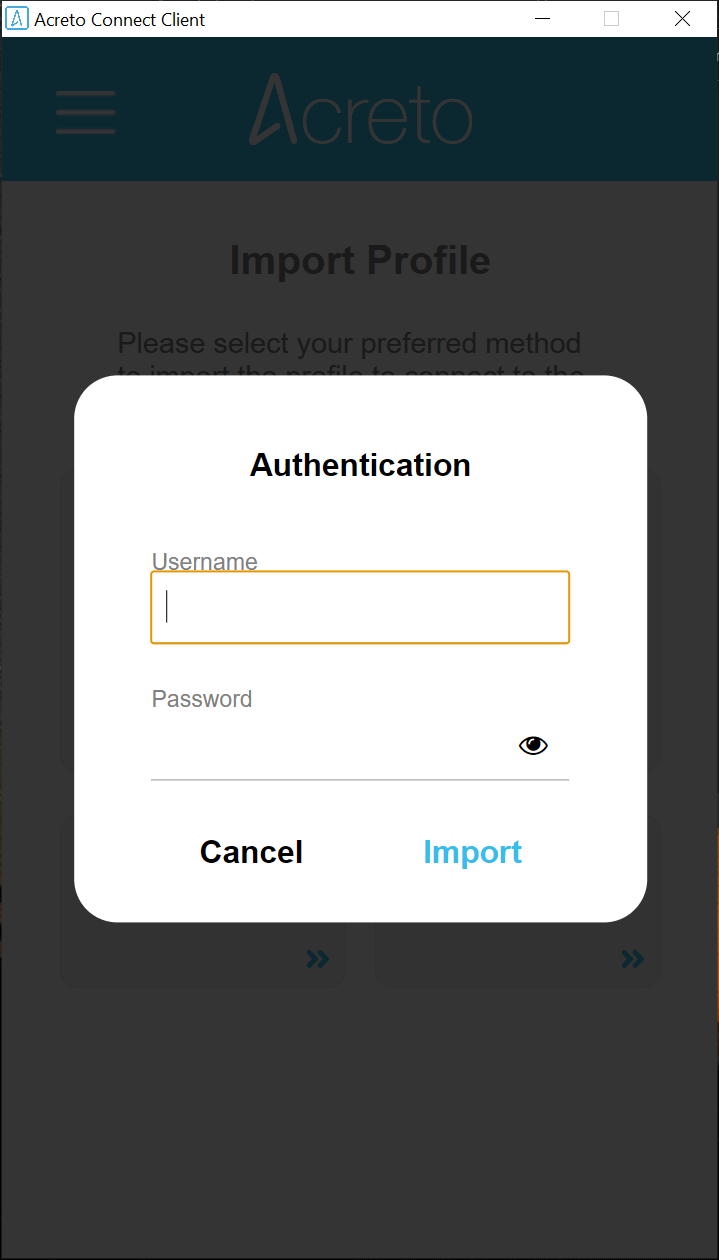
- If the profile requires Username and Password to connect, please enter them followed by a click on button Import:
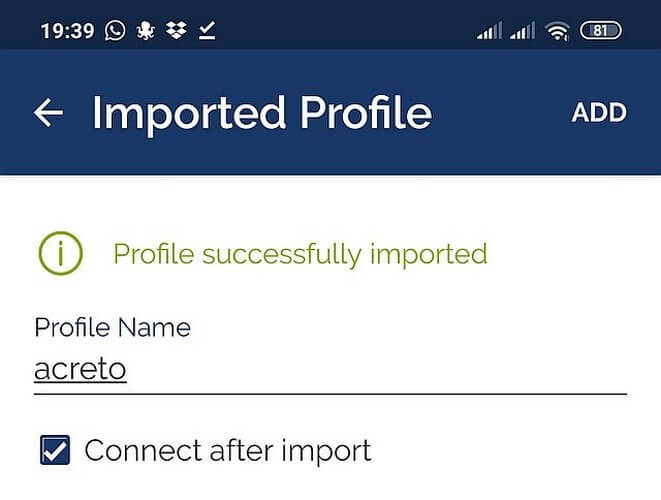
- All set. The imported profile should be available under the Profiles list.
Import Profile from URL
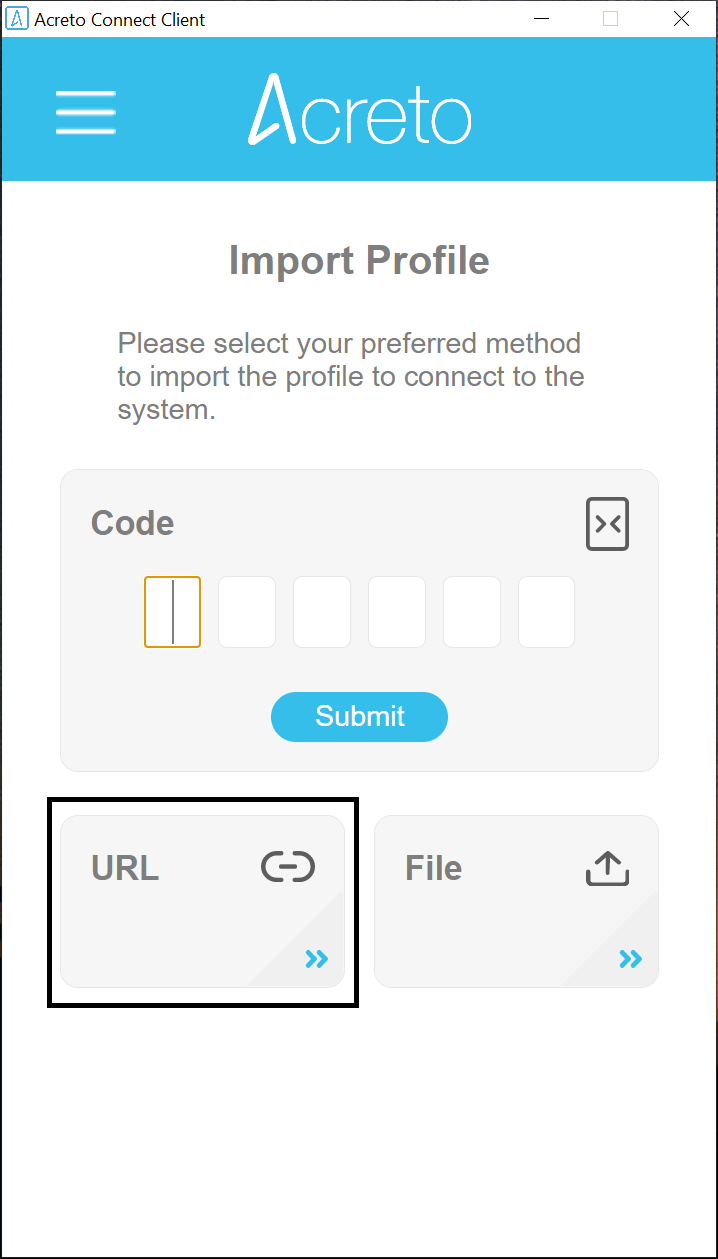
- Select the option URL under the available import options:
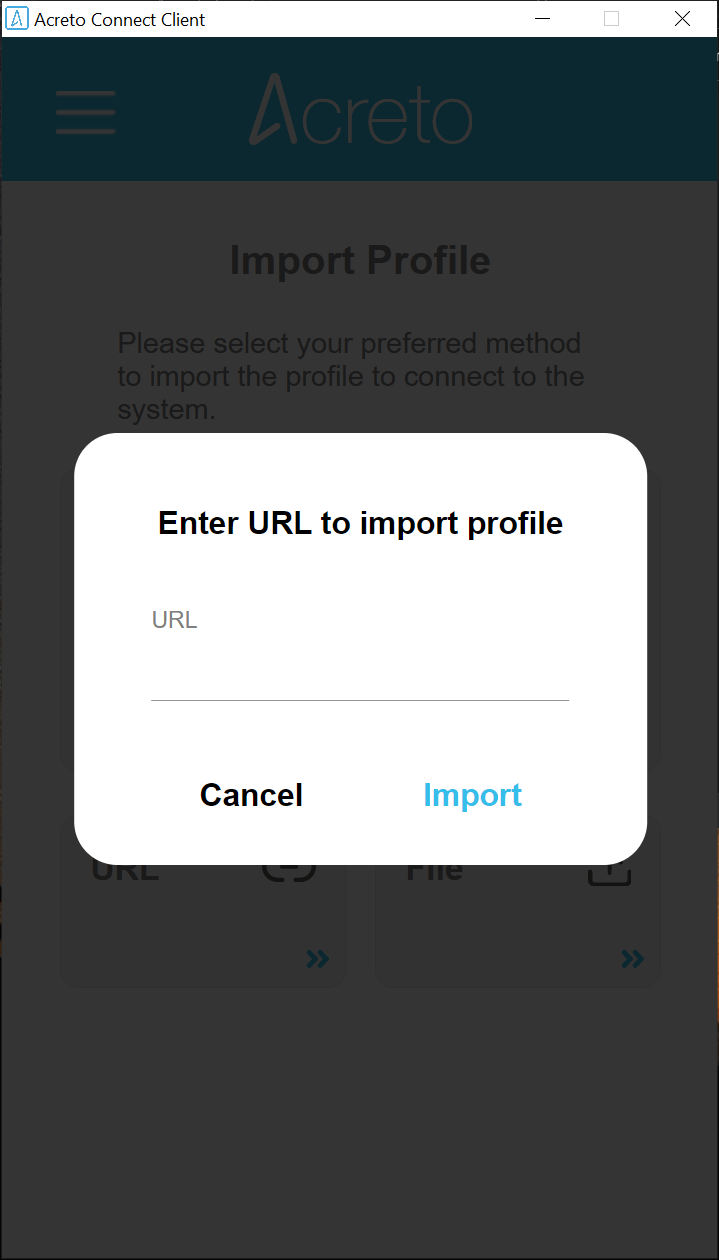
- Under the URL field and enter the profile URL provided by your system administrator:
- If the profile requires Username and Password to connect, please enter them followed by a click on button Import:
- All set. The imported profile should be available under the Profiles list.
Import Profile from file
- Select the option File under the available import options:
-
Pick the VPN Profile file provided by your system administrator.
-
If the profile requires Username and Password to connect, please enter them followed by a click on button Import:
- All set. The imported profile should be available under the Profiles list.
Establishing connection
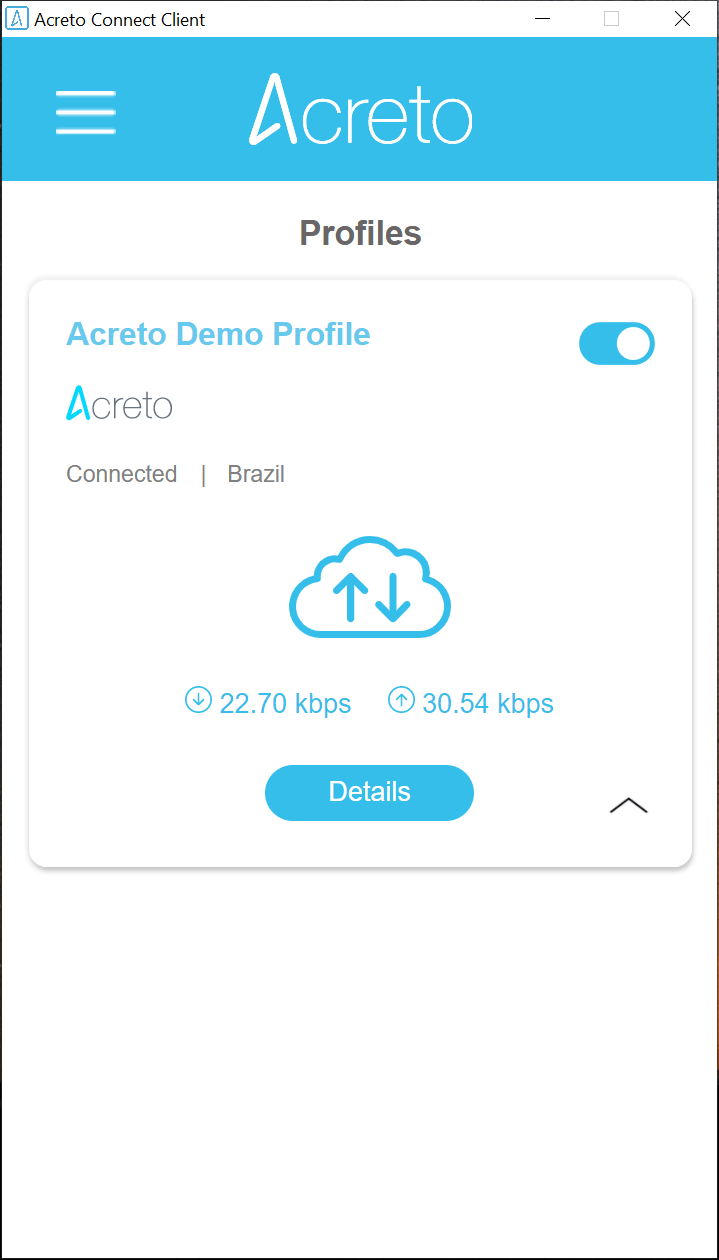
To establish the connection with the intended Acreto server, just toggle the connection switch to the On position:
Once the connection starts, the switch should be displayed in blue, like in the image below:
To disconnect from that VPN connection just toggle the switch back and wait until its color becomes grey again.
Tip
Do not use any other VPN Clients when ACC is connected
Please avoid using any other VPN clients when the Acreto Connect Client (ACC) is connected. Running multiple VPN clients simultaneously can cause network conflicts, connectivity issues, and may compromise security. To ensure optimal performance and a secure connection, disconnect any other VPN services before connecting with ACC.
Supported Operating Systems
Introduction
Acreto is focused on security. One crucial part of infrastructure security is up-to-date software. That’s why our Acreto Connect Client does not support installation on outdated operating systems.
Supported Operating Systems
You can install and use Acreto Connect Client on any popular and up-to-date operating system.
Windows:
- Windows 10 - minimum version 21H2 - build
19044 - Windows 11 - minimum version 21H2 - build
22000 - Windows Server - minimum 2016 LTSC - build
14393
macOS:
- macOS - minium version
14(Sonoma)
iOS
- iOS - minimum version
15
Android
- Android - minimum version
12(Snow Cone)
We strongly suggest that users of Acreto Connect Client update their operating systems to the versions the creators support to ensure maximum security, compatibility, and performance.
What if my Device does not meet Minimal Requirements?
If your operating system is older than the one on the list, we strongly suggest updating it or changing your device.
Acreto can’t ensure proper support for those devices. This means we cannot guarantee that the software will work properly and allow you to connect securely to the Ecosystem.
Edit or Delete Profile
Getting started
If you need to edit details of your connection or completely remove one of the existing profiles use procedures described below.
Editing VPN profile
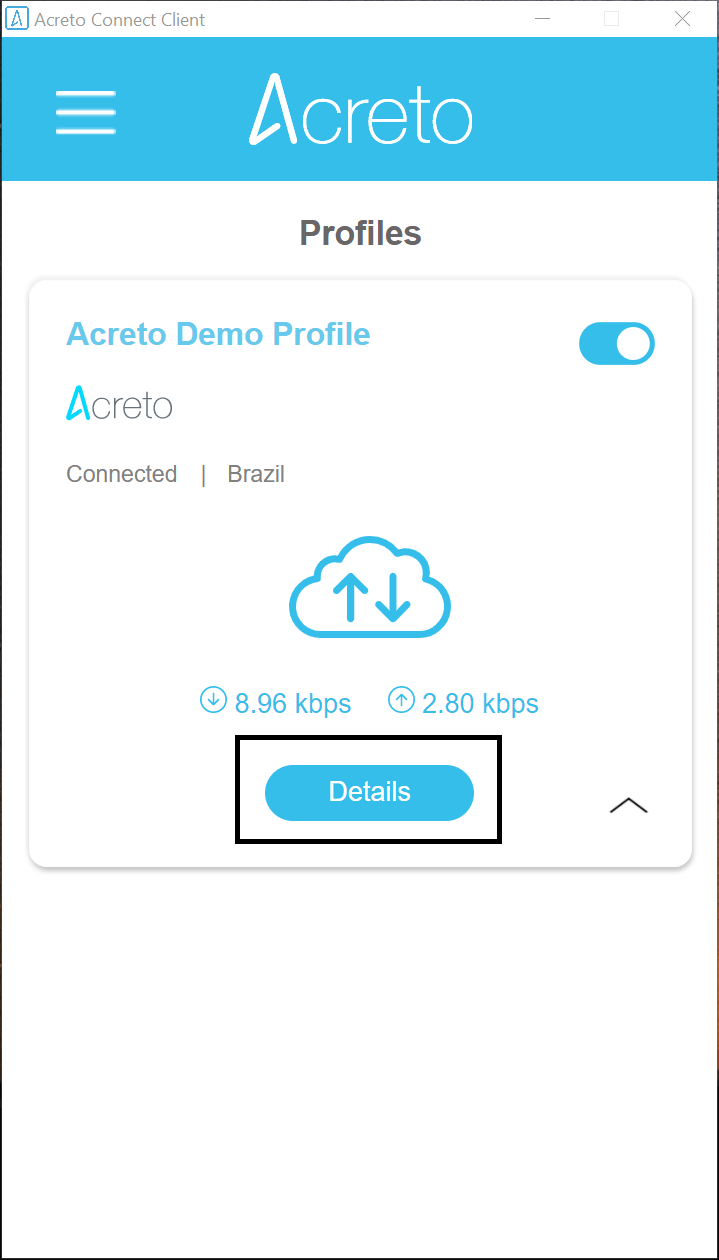
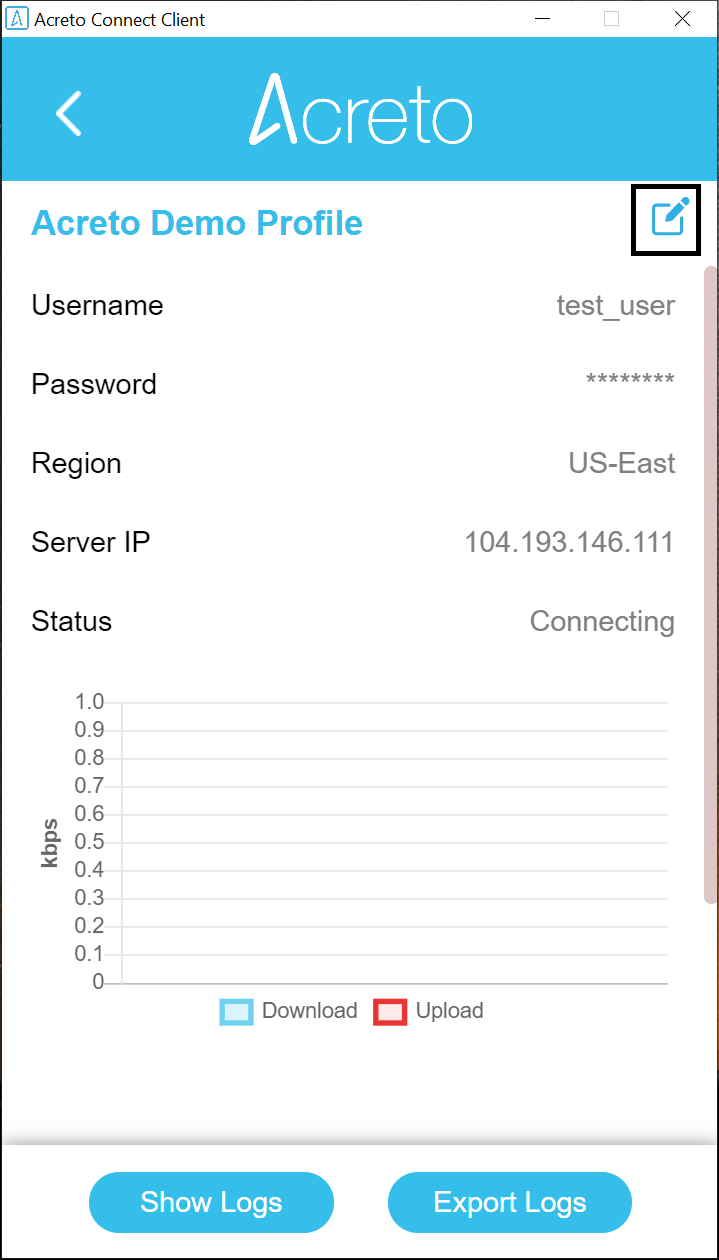
- To Edit a Profile, navigate to the Profile Details:
- Then click on the Edit button located on the top right corner:
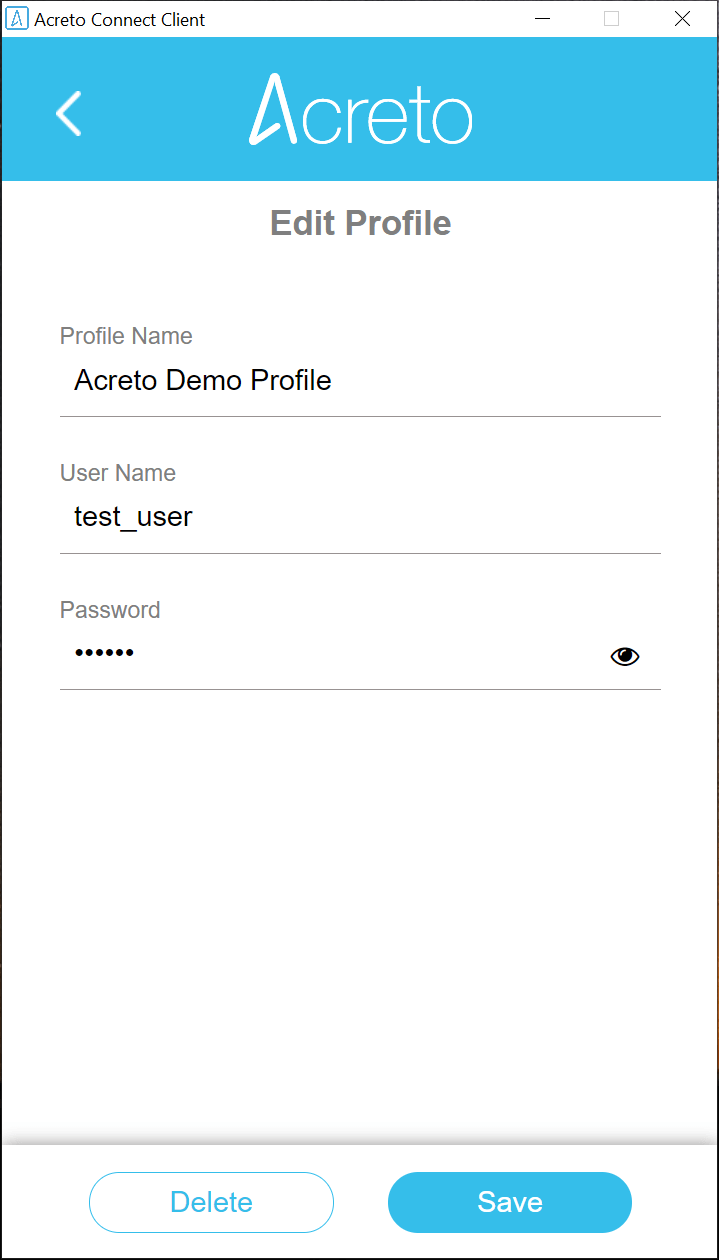
- Edit the Profile details and then save the changes by clicking the Save button:
Deleting VPN profile
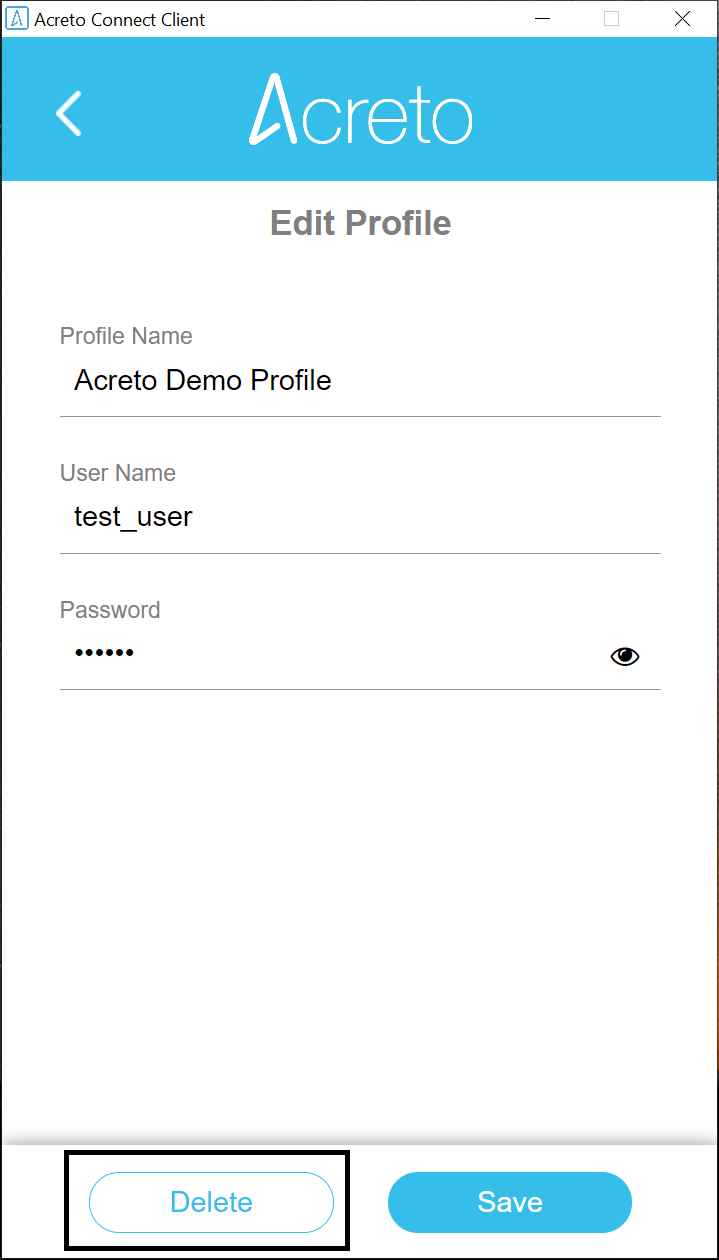
To delete a profile, navigate to the Edit Screen as shown in the steps of the Editing VPN Profile section above and then click the button Delete to completely erase the VPN profile from your system:
Android Installation
Installation
Please follow the steps below to install Acreto Connect Client:
-
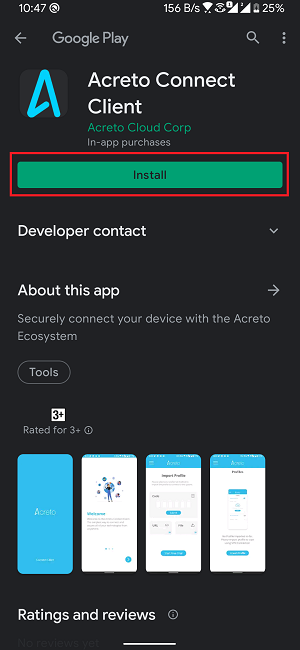
Go to the download page and click on the Google Play Store image.
-
Install the Acreto Connect Client application.
-
Once the application is installed, launch it from your home screen or menu.
-
All set, now you can start using Acreto Connect Client.
Always-on VPN configuration
Always-on VPN is an Android function that works like an automated service that establishes a connection between the client and the VPN with no user interactions whatsoever. It is a one-time configuration.
How to enable always-on VPN:
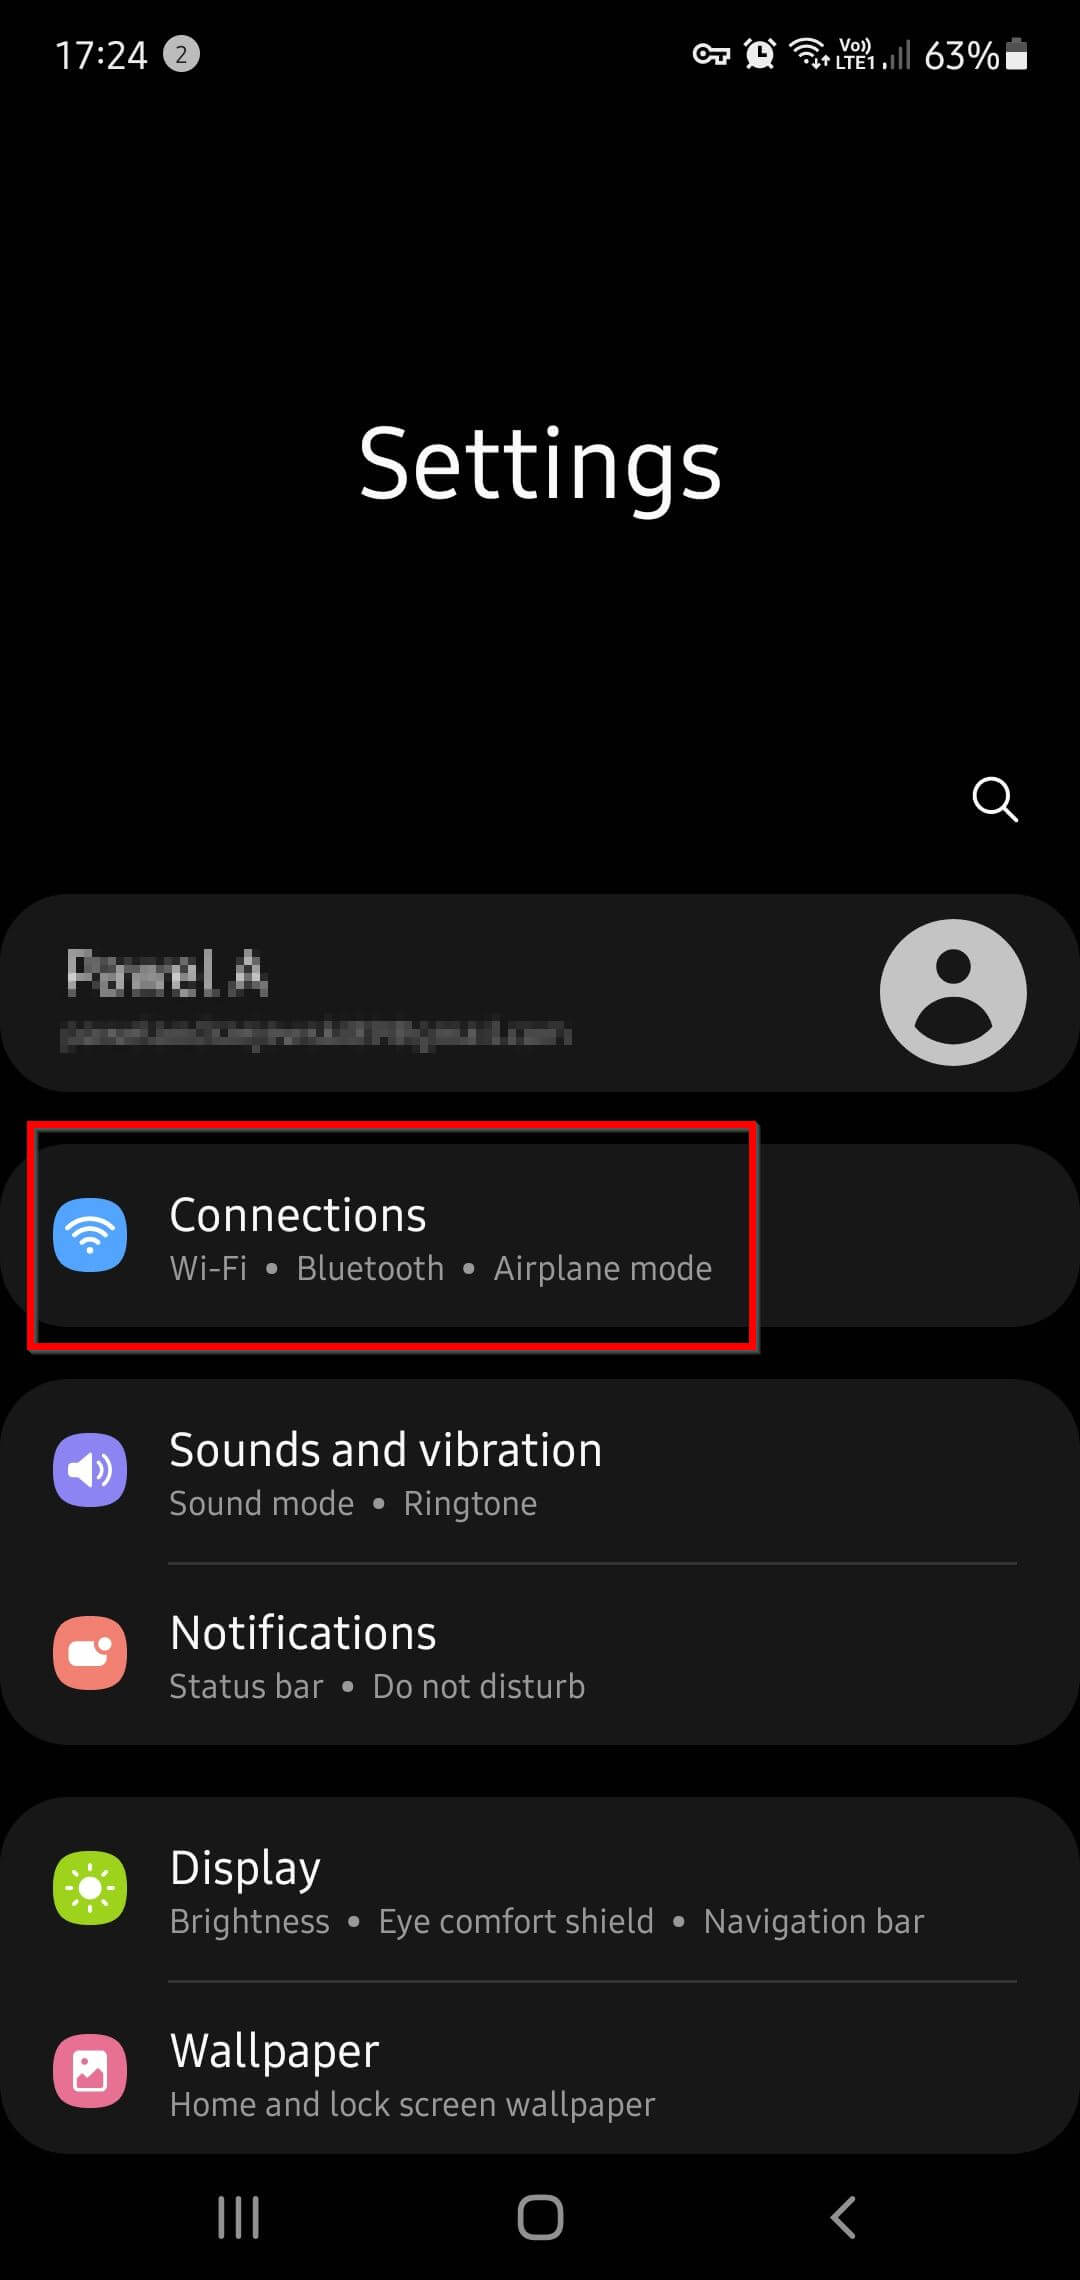
- Go to device settings

- Choose the Connections from the list of options
- Swipe up to see More connection settings
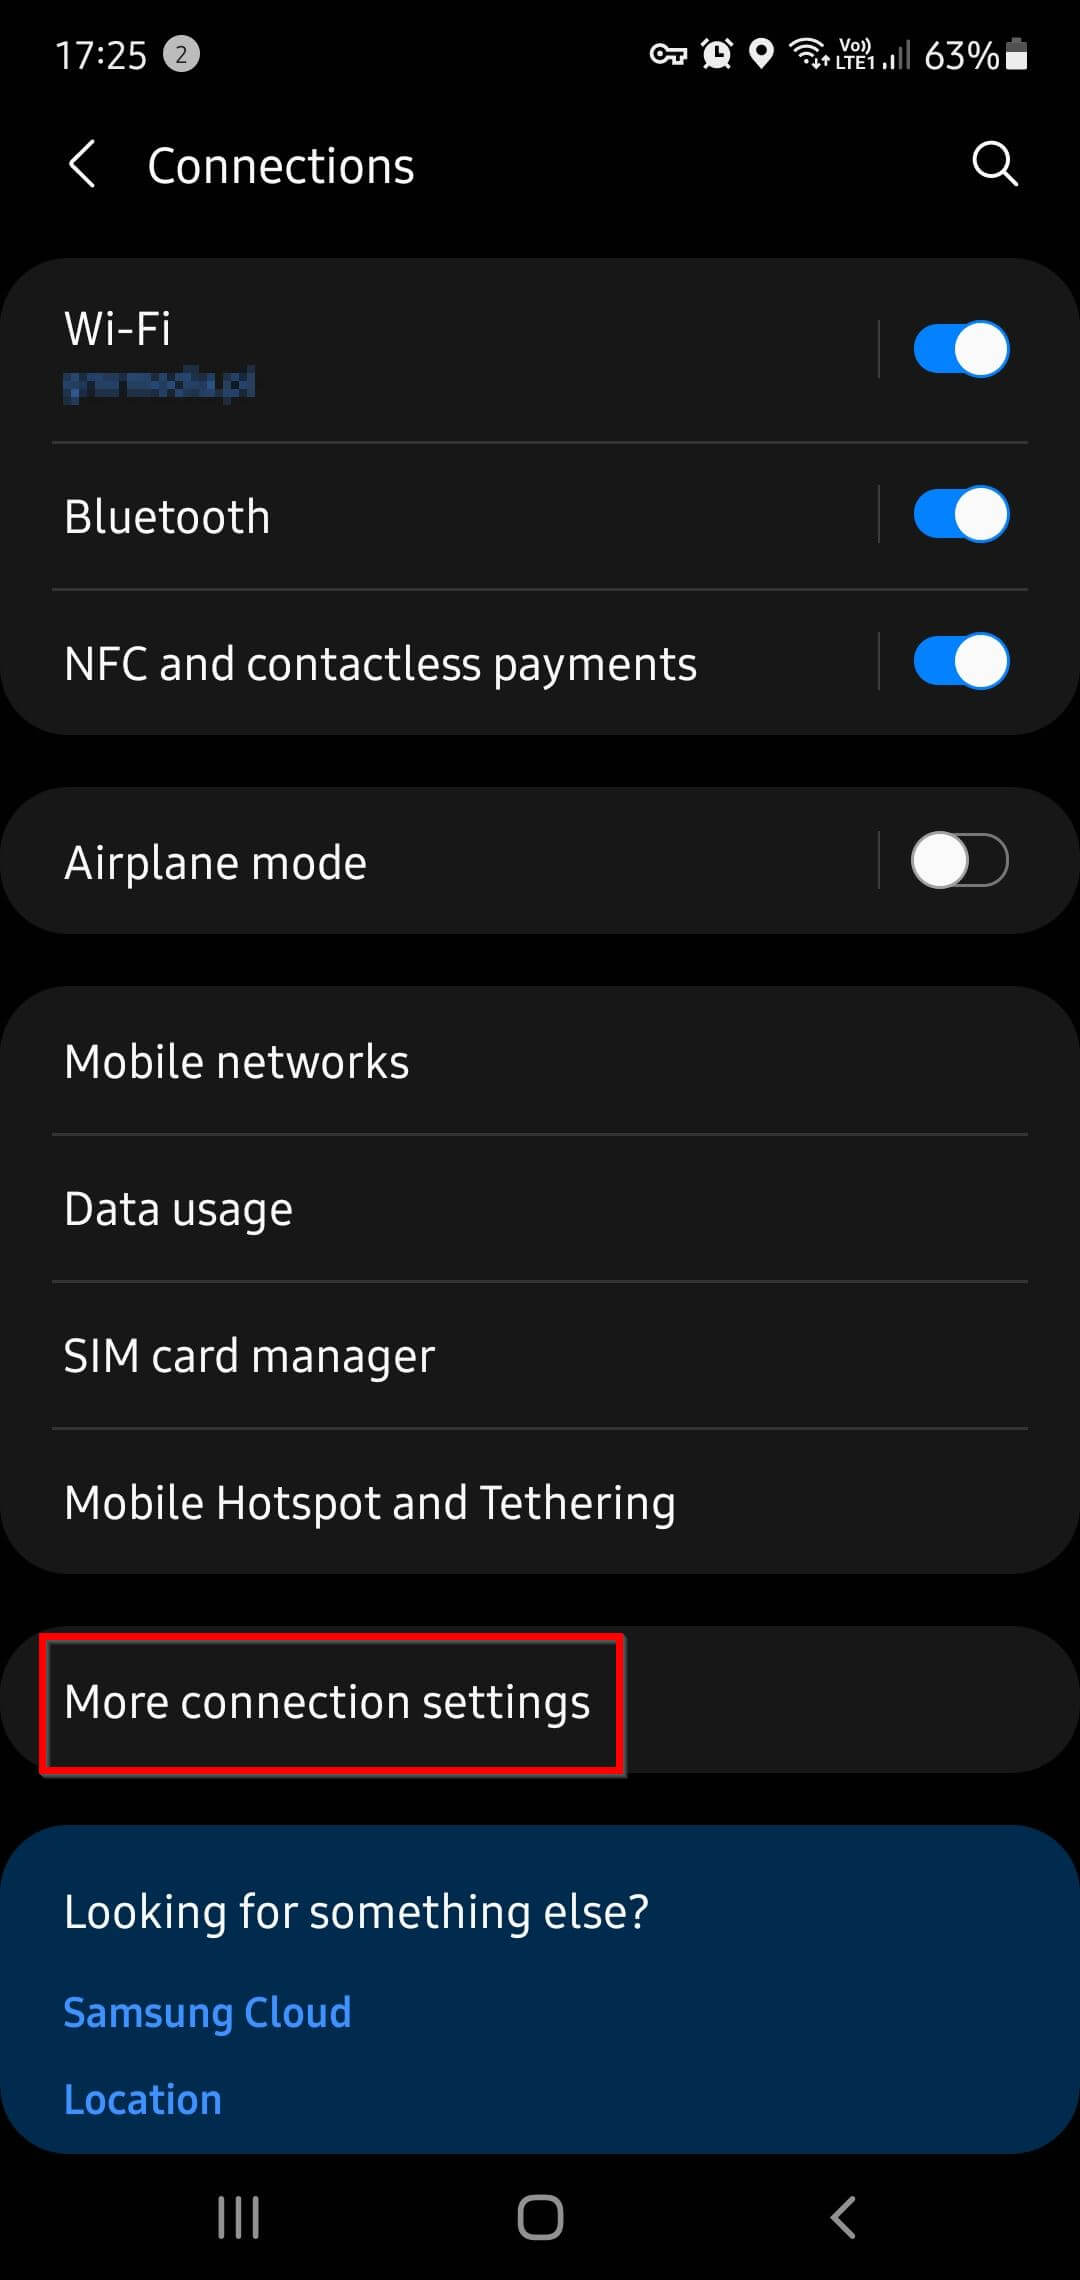
- Tap on the VPN option
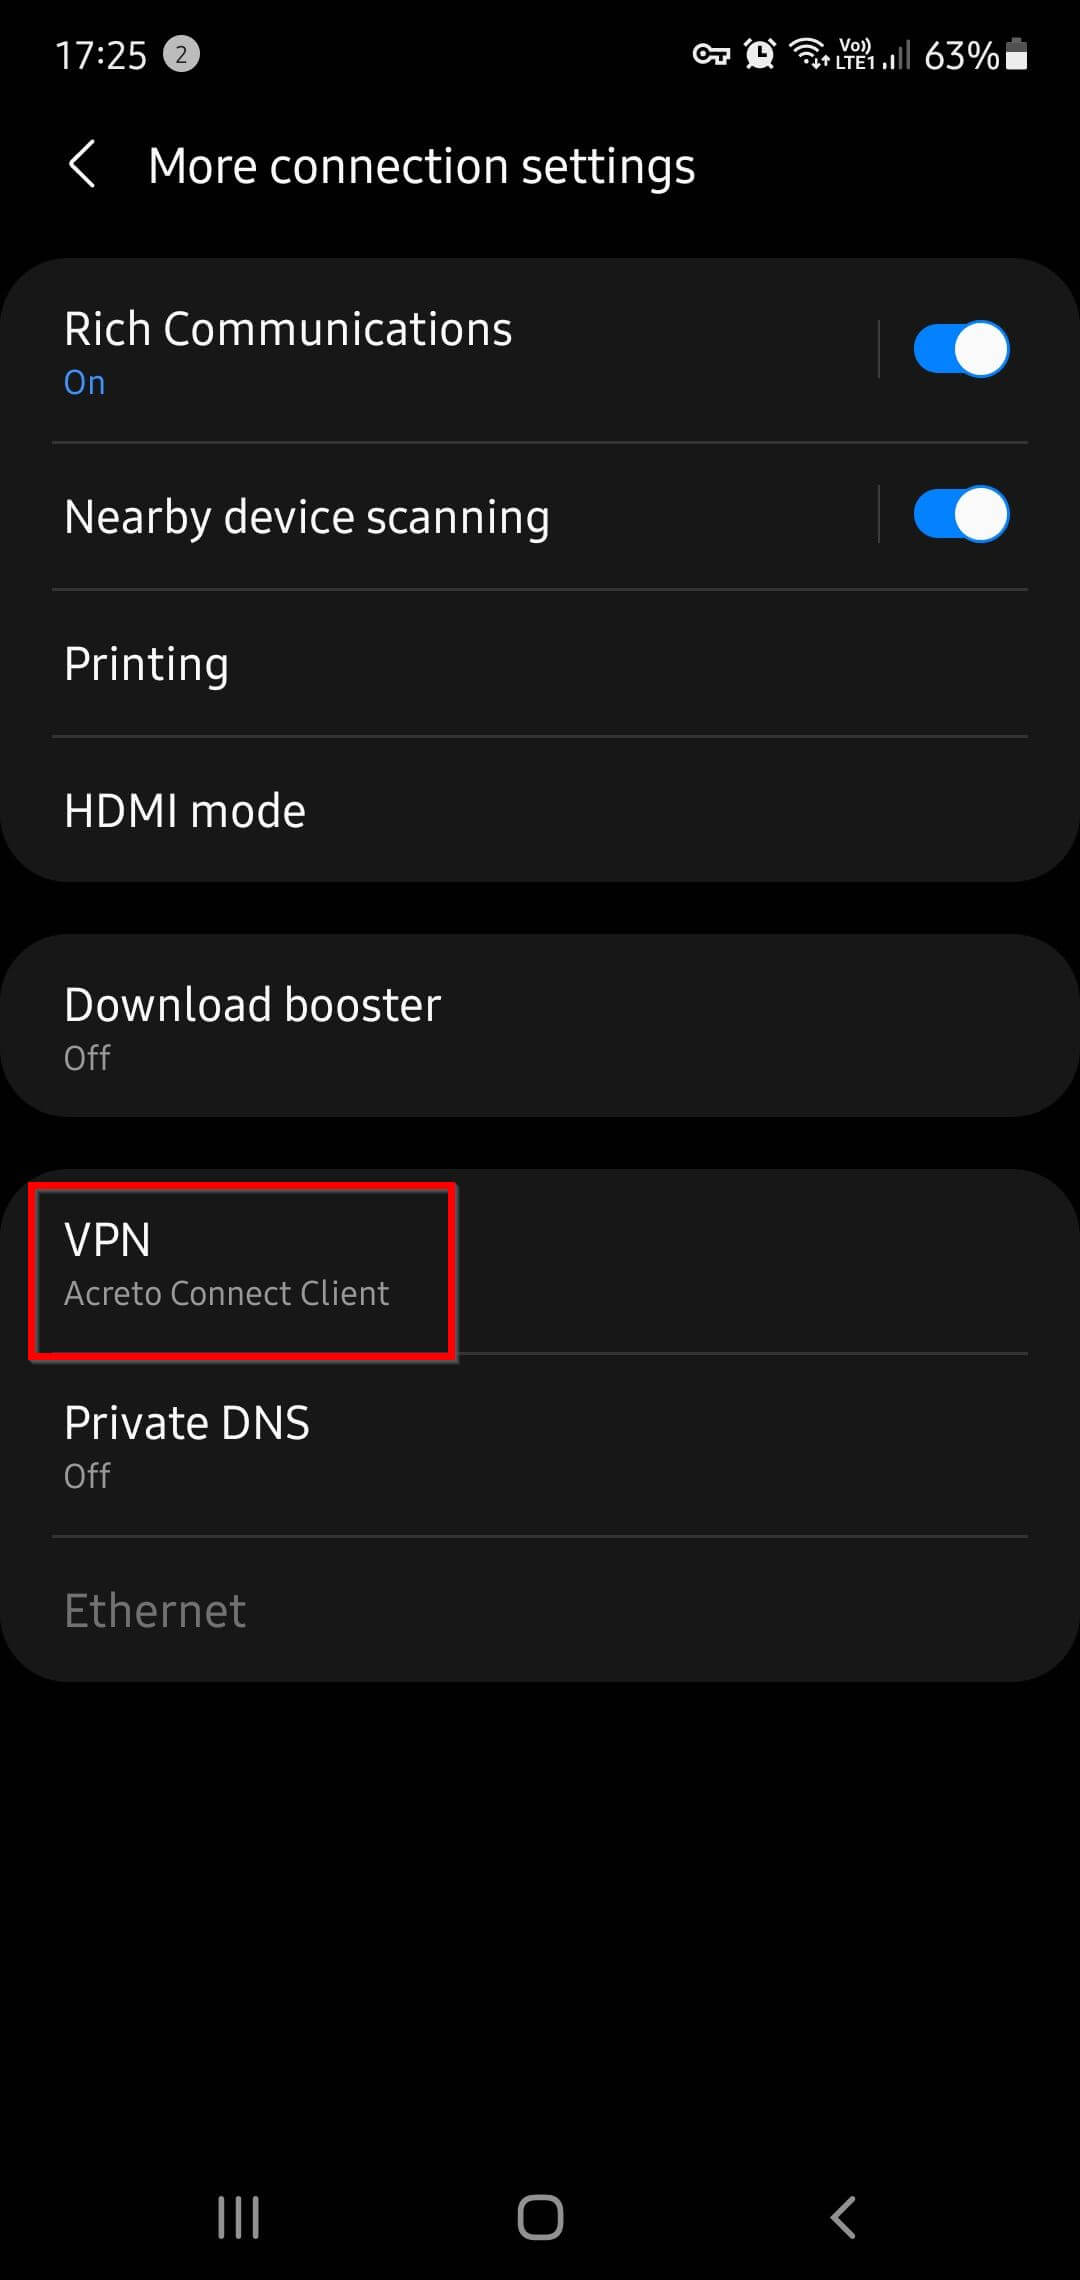
- Tap on the Settings icon for Acreto Connect Client.

- Turn on the Always-on VPN option
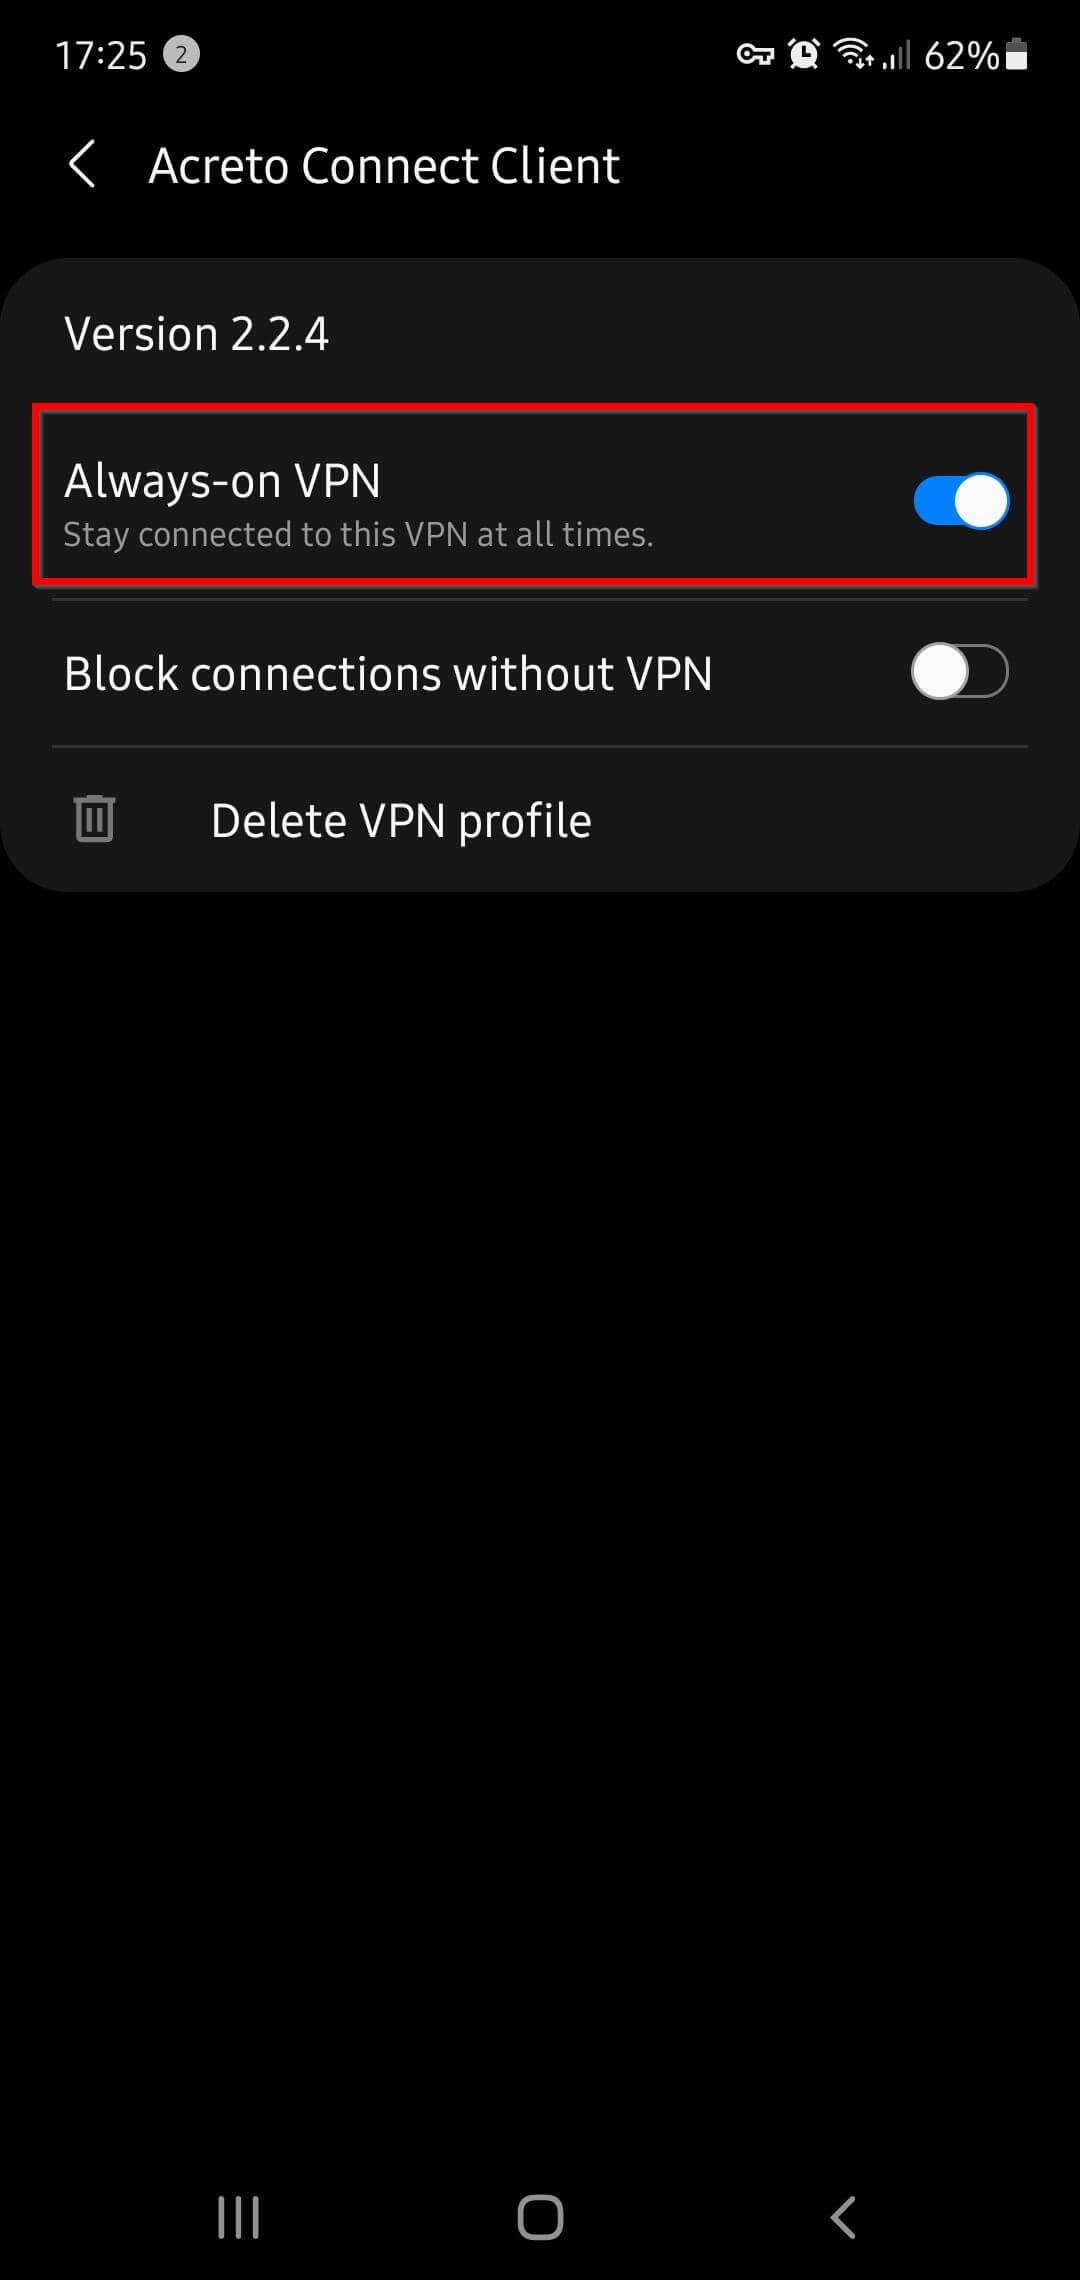
- If Andoird will ask for permission grant them.
To test if it works, establish any connection to Acreto Ecosystem and restart your device. After reboot, this connection should be established automatically.
Android will automatically establish a VPN connection to the Acreto ecosystem when needed - for example, after restarting the device. If you have more than one profile in ACC, the most recently used profile will start.
This feature is available for Android 7.0 and above.
Next step
iOS Installation
Installation
Please follow the steps bellow to install Acreto Connect Client:
-
Go to the download page and click on App Store image.
-
Tap on the GET button to install the app
-
All set, now you can start using Acreto Connect Client.
Next step
MacOS Installation
Installation
Please follow the steps bellow to install Acreto Connect Client:
-
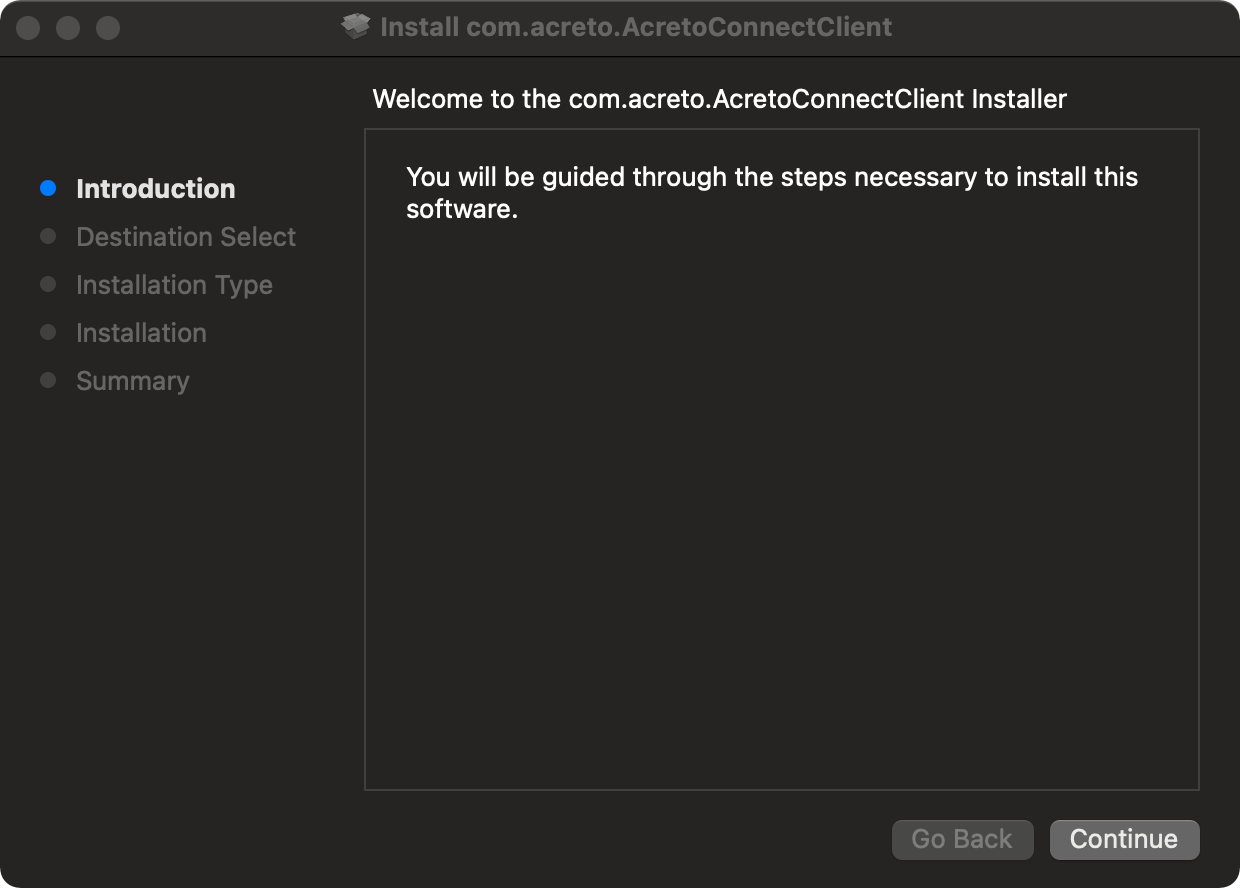
Go to the download page and download client for MacOS.:
-
Double click on the downloaded installer file:
- Click Continue to continue installation:
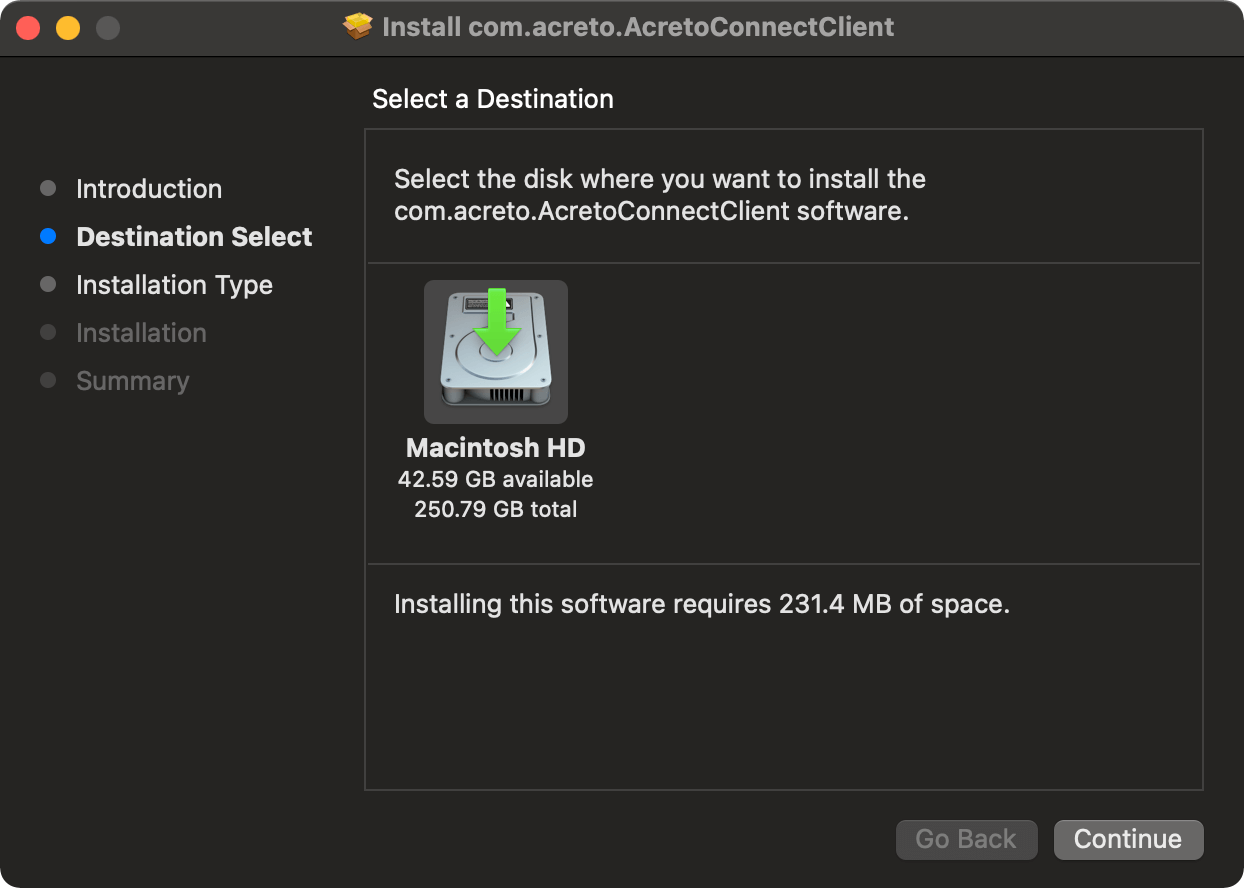
- Select the destination of the installation and then click Continue:
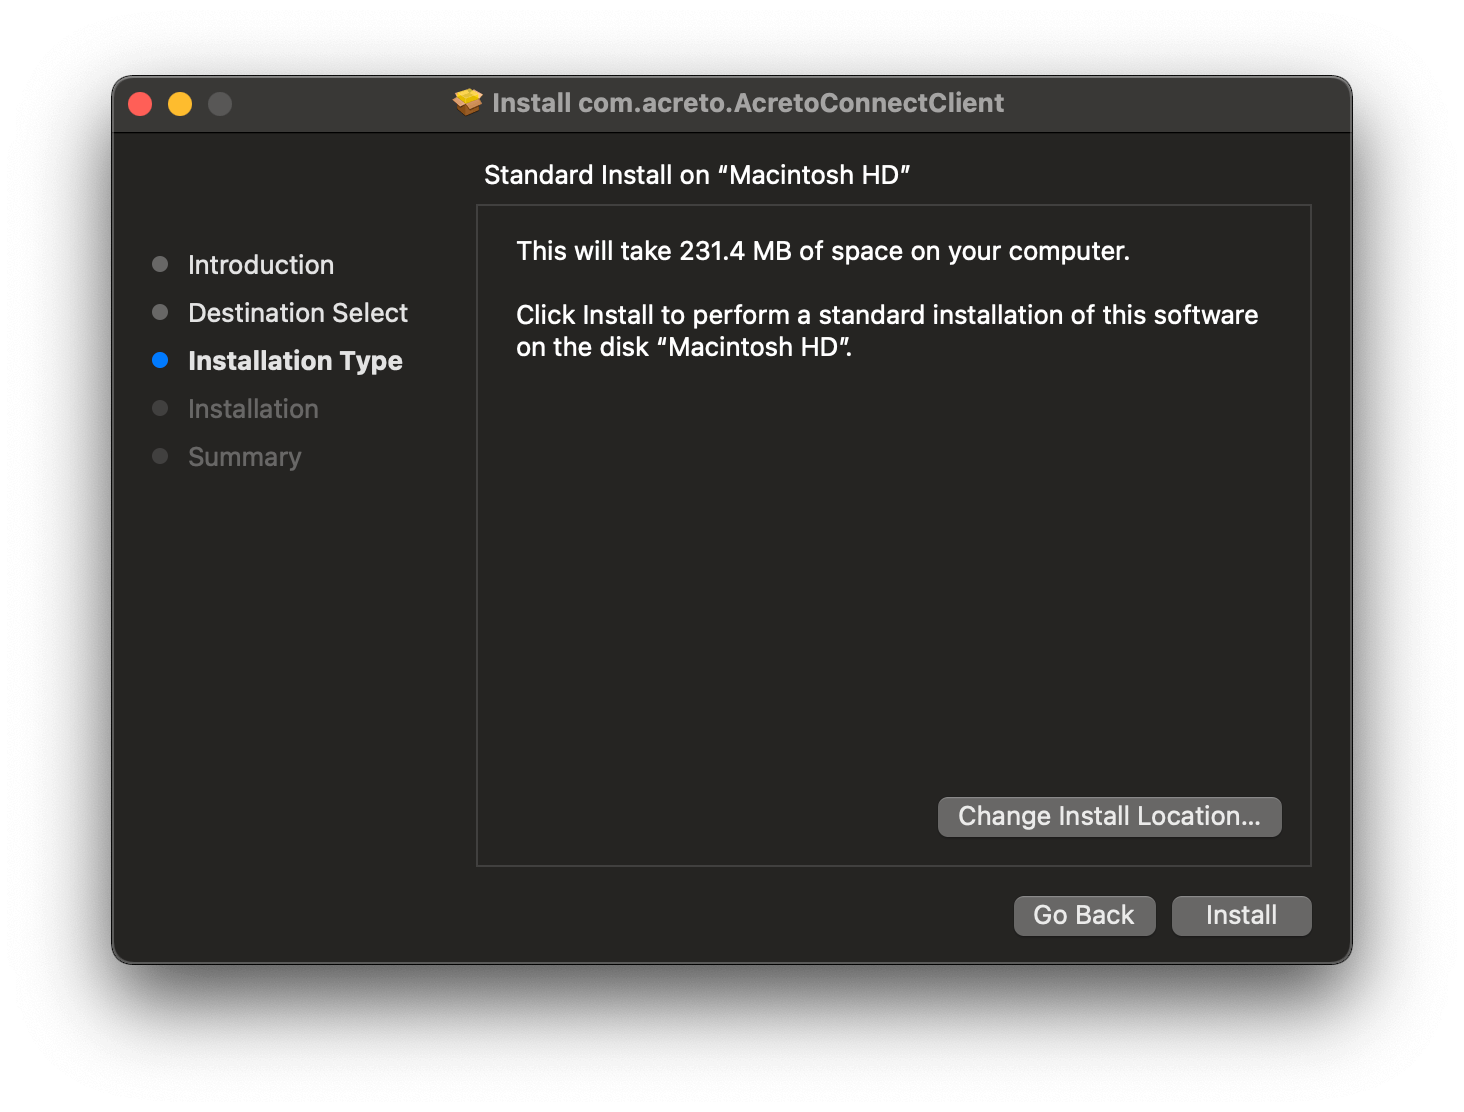
- Select the installation type and then click Install:
- Once installation is completed, just click button Close:
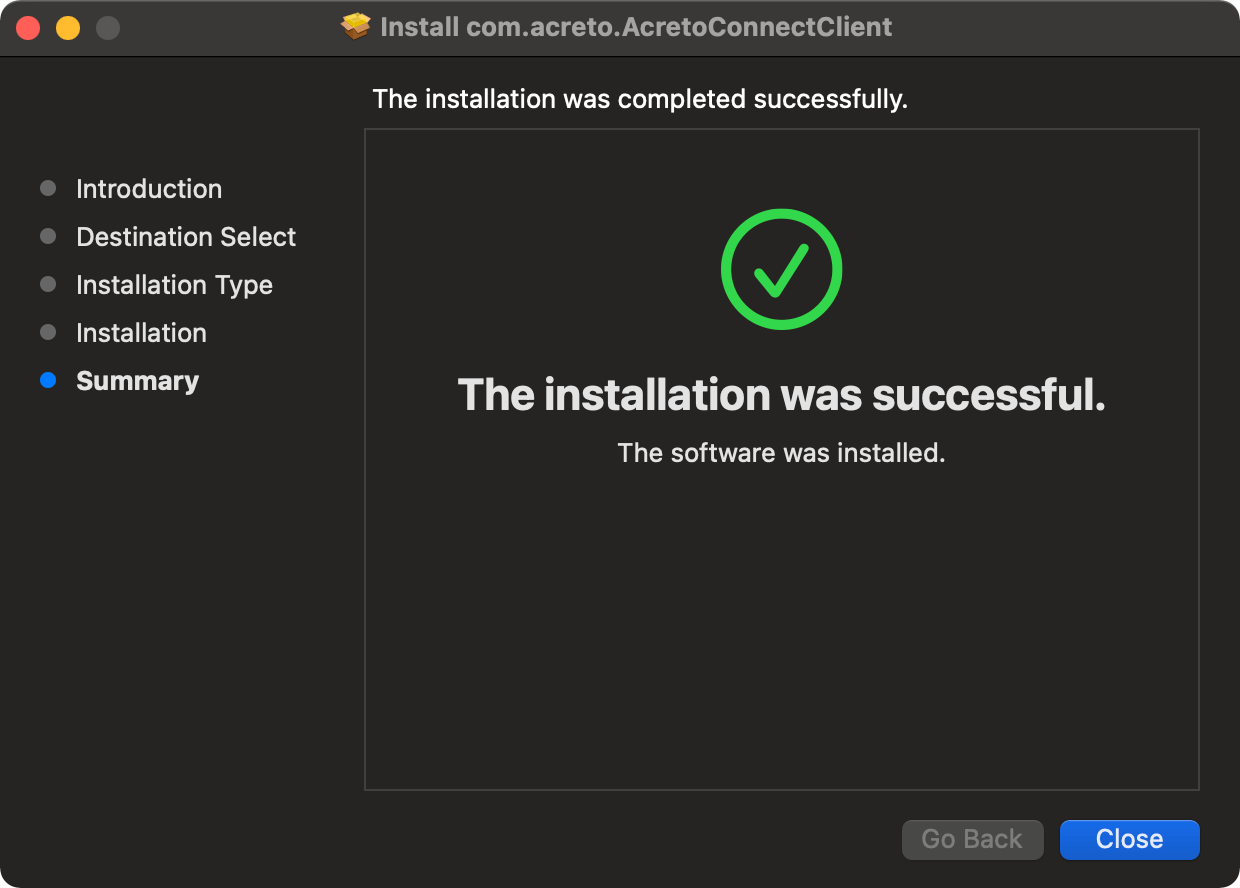
- All set, now you can start using Acreto Connect Client.
Next step
ACC Logs Collecting on macOS
When Should I Collect the Logs?
The main scenario for the Logs Collecting:
- Troubleshooting Connectivity Issues: If users report difficulties in establishing or maintaining a VPN connection, logs can provide insights into whether the problem lies with the client, network, or server.
- Performance Degradation: When there is a noticeable drop in network performance or speed while using the VPN, collecting logs can help identify bottlenecks or configuration issues causing the slowdown.
- Error Analysis: After encountering specific error messages or codes on the VPN client, logs can help decipher the exact nature and cause of these errors.
In essence, a logs collecting should be done whenever there is a need to analyze and understand the behavior of the VPN client and the network, diagnose issues, maintain security standards, and ensure optimal performance.
In most of the cases Acreto Support Engenners may ask you to collect the logs and share the results, before they start to solving your issue.
How to Collect the Logs?
To collect logs from a macOS device, you need to copy and paste specific files.
- Create the
acc-logsdirectory at your macOS desktop. - Open Finder and switch to
/private/var/log/folder. - Copy the acreto.log to the acc-logs catalog.
- Use Finder and switch to the
<user_path>/Library/Application Support/acreto/profiles/folder and copy all .log and .conf to the acc-logs catalog. - Move to
<user_path>/Library/Application Support/acreto/and copy the acreto.log file to the acc-logs folder. - Right-click (or Control-click) on the acc-logs folder, and from the menu, choose Compress [filename].
- Share the compressed file with Acreto Support Engineers.
Netwok Configuration
Network configuration is a crucial part of understanding connection issues on user devices. To share this configuration with Support Engineers, run the below commands in the terminal, replacing the acc-logs path with the full path to the directory:
ifconfig >> acc-logs/ifconfig.txtnetstat -an >> acc-logs/netstat.txtroute -n get default >> acc-logs/route.txtarp -a >> $acc-logs/arp.txt
Summary
The Logs Collectin gathers all information that may be useful in the issue-solving process. It reduces the time needed to solve the issue at end-user device.
ACC Logs Collector
Designed to streamline troubleshooting for Acreto Connect Client VPN issues, the Logs Collector gathers comprehensive log data, aiding Acreto Support Engineers in diagnosing and resolving issues effectively.
When Should I Use the Logs Collector?
The main scenario for the Logs Collector:
- Troubleshooting Connectivity Issues: If users report difficulties in establishing or maintaining a VPN connection, logs can provide insights into whether the problem lies with the client, network, or server.
- Performance Degradation: When there is a noticeable drop in network performance or speed while using the VPN, collecting logs can help identify bottlenecks or configuration issues causing the slowdown.
- Error Analysis: After encountering specific error messages or codes on the VPN client, logs can help decipher the exact nature and cause of these errors.
In essence, a logs collector should be used whenever there is a need to analyze and understand the behavior of the VPN client and the network, diagnose issues, maintain security standards, and ensure optimal performance.
In most of the cases Acreto Support Engenners may ask you to use this tool and share the results, before they start to solving your issue.
How to Use Logs Collector?
Windows Logs Collector
Logs Collector for Windows is a PowerShell script that the User needs to run on the device where the issue occurs. Follow the below procedure:
-
Download the Logs Collector Script and save it in Download folder.
-
Run the PowerShell tool with Admin Priveledges:
- In the system search bar, type
PowerShell - Find the PowerShell on the list
- From the options, choose Run as Administrator
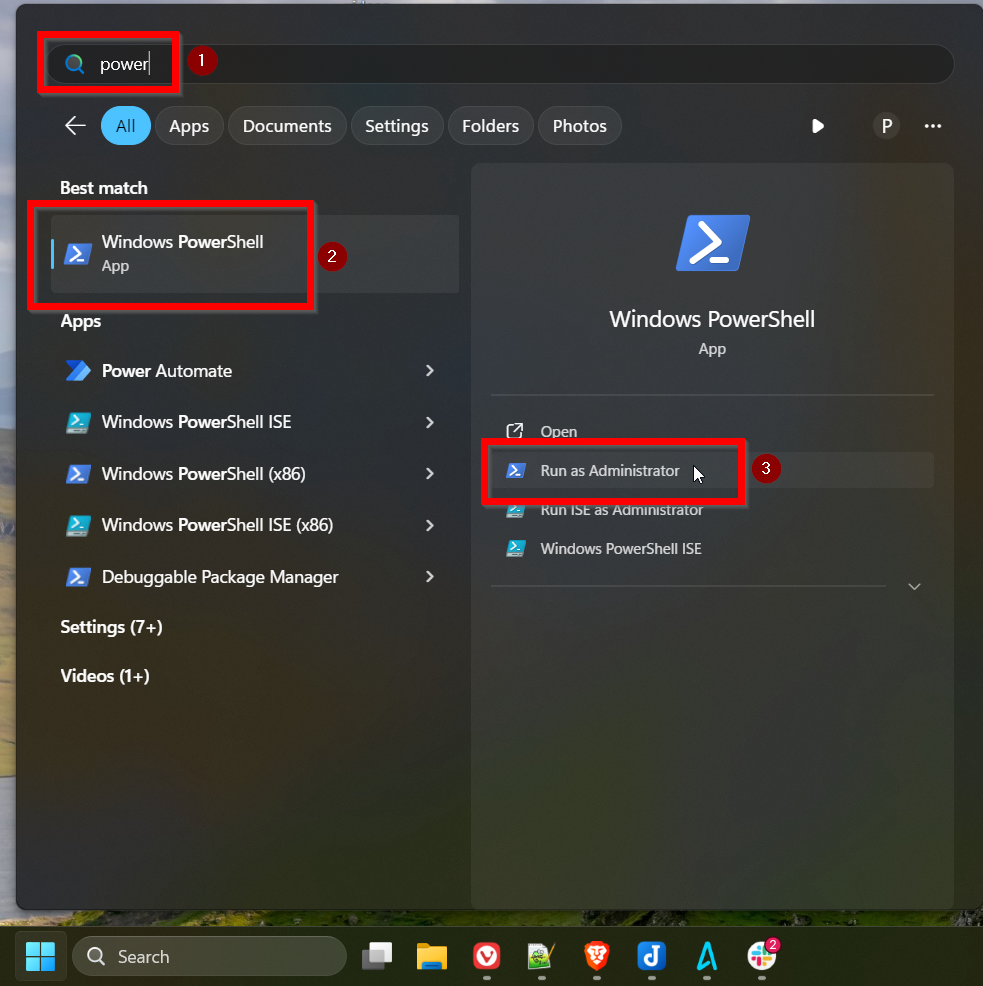
- In the system search bar, type
-
Go to the Download where you saved the Logs Collector - paste the below code in the PowerShell terminal
cd ~\Downloadsthen hit Enter.
-
Paste the below code in the terminal to temporarily change the Execution Policy.
Set-ExecutionPolicy -ExecutionPolicy Unrestricted -Scope LocalMachineConfirm the change in the terminal prompt.
-
Run the Logs Collector Script:
.\acc-logs-collector.ps1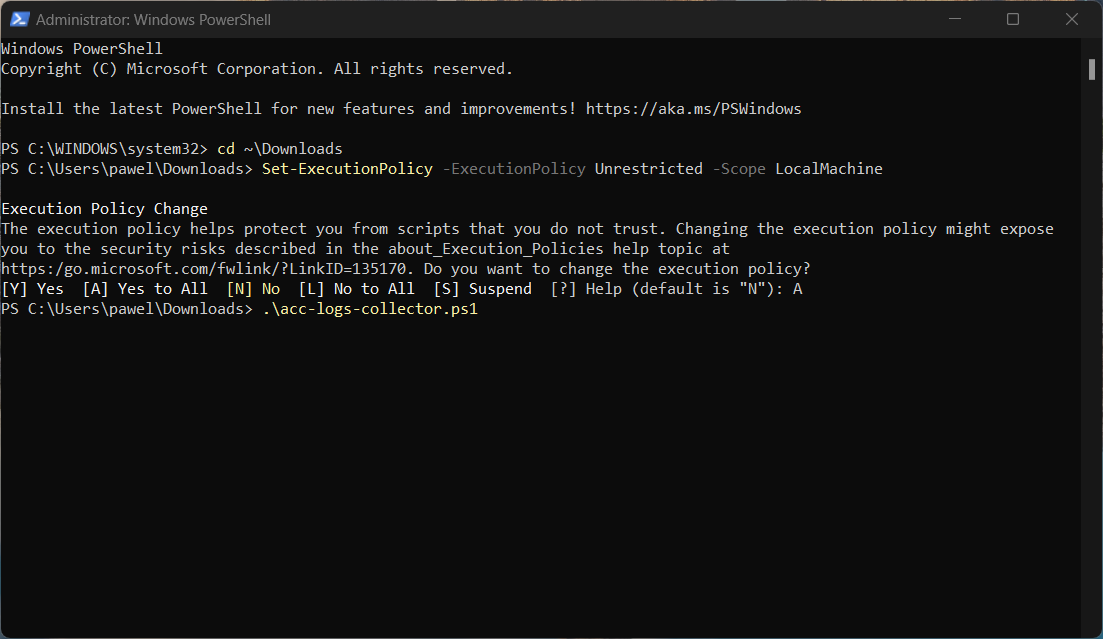
Press Enter, and confirm that you want to run this script.
-
Now, the script collects all logs and helpful information for the issue-solving process. From the script output, you can get where the .zip archive with all logs is stored:

-
This directory should now contain an archive with all the logs.

-
Restore the old Execution Policy by pasting this code into the PowerShell terminal
Set-ExecutionPolicy -ExecutionPolicy Restricted -Scope LocalMachine -
Share this archive with the support engineers
Summary
The Logs Collector tool gathers all information that may be useful in the issue-solving process. It reduces the time needed to collect information from the end-user device.
Windows Installation
Windows version of the Acreto Connect Client may be installed by .EXE file (All Windows versions)
Installing from an EXE file
Please follow the steps bellow to install Acreto Connect Client:
-
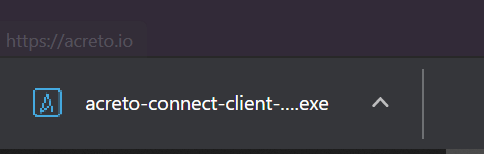
Download the installer available here:
-
Double click the .exe installer:

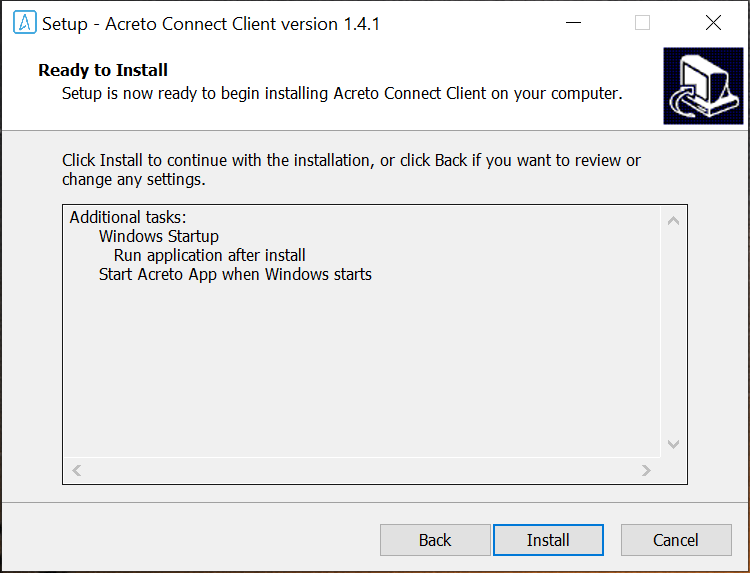
- Select the desired installation options and click Next to continue installation:
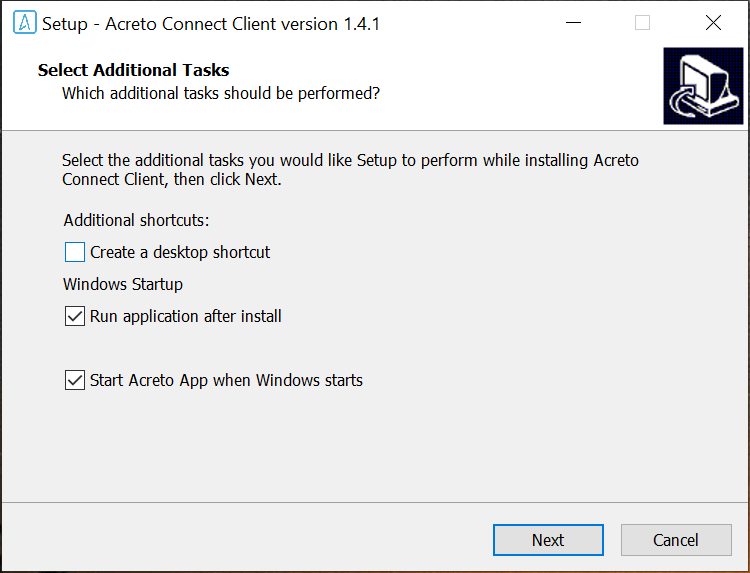
- Confirm the options and click Install to complete the app installation:
- Once installation is completed, the following screen should be displayed:
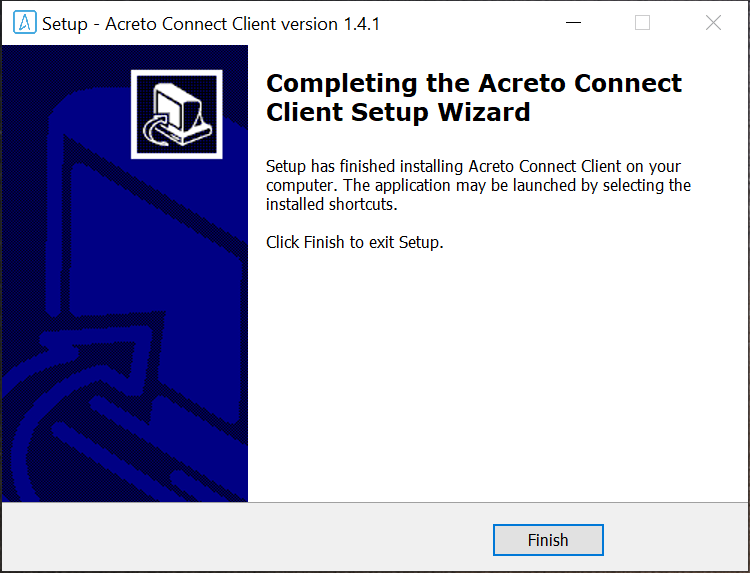
- All set, now you can start using Acreto Connect Client.
Tip
Do not use any other VPN Clients when ACC is connected
Please avoid using any other VPN clients when the Acreto Connect Client (ACC) is connected. Running multiple VPN clients simultaneously can cause network conflicts, connectivity issues, and may compromise security. To ensure optimal performance and a secure connection, disconnect any other VPN services before connecting with ACC.
Next step
Tap Adapter Issue
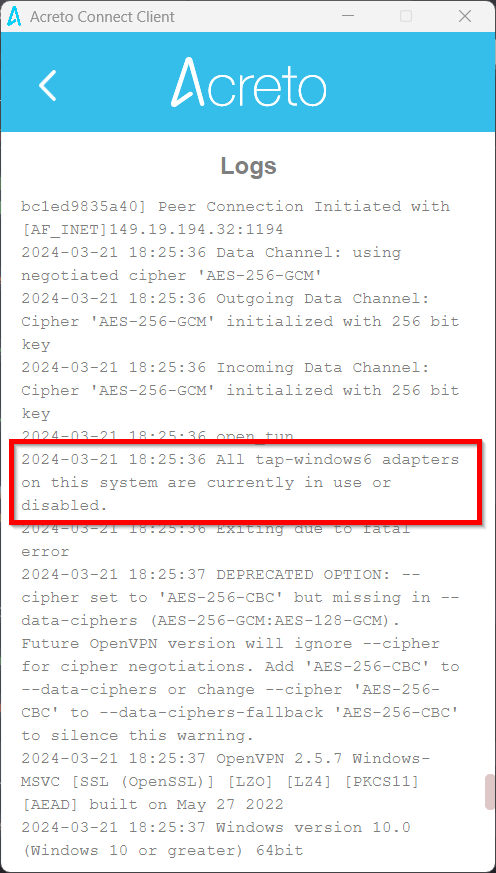
If you are a Windows 11 user, and you can’t connect using Acreto Connect Client you may experience a connection problem similar to one video below.
If you check the logs, you may find the logs with this information:
All tap-windows6 adapters on this system are currently in use or disabled
Cause of a problem
In one of the last updates, Microsoft changed the way of driver verification—all drivers signed in the old way may stop working or start misbehaving.
One of the affected drivers is a TUN/TAP interface driver used by Acreto Connect Client.
Solution
Please follow the steps below to solve the issue:
- Click Start (or hit the Windows key) to open the Start Menu.
- In the search dialog box, type
ncpa.cpland press enter.
- You will see the list of all interfaces available in your system.
- Seach for any interface with Acreto Connect Client X name (where ‘X’ is a number).
- Click the right mouse button on this interface and choose Enable from the list of options.
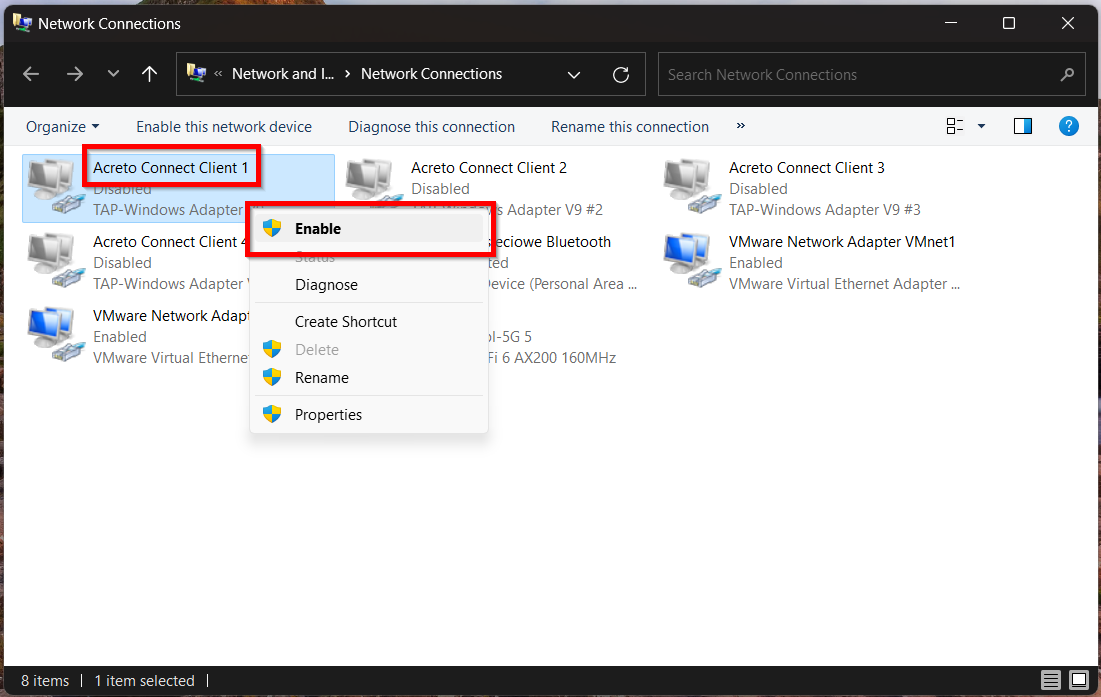
- Go to Acreto Connect Client and try to establish a connection once again.
Next step
This issue may repeat continuously if using the Acreto Connect Client below version 2.9.7.
Please repeat the procedure I’ve described any time an issue happens.
Users Onboarding Portal
Onboarding portal procedures
Subsections of Users Onboarding Portal
I Got an Invitation - What's Next?
Overview
If you’re reading this article, you probably got an invitation email or link from a security or network officer in your company. At this point, you may like to read this article to learn what Acreto is.
This article will guide you through the onboarding process to Acreto, allowing you to secure your internet connection and provide access to your company infrastructure.
How to Join - Onboarding Procedure
- Click on the provided URL or email invitation.
- A new page will open in your default browser. You must validate two values:
- Company name - on the screen below it’s a TestCompany, you should see the name of your company here.
- Ecosystem - on the screen below it’s a Test Ecosystem, you should see the name of your physical location, project or company department here.
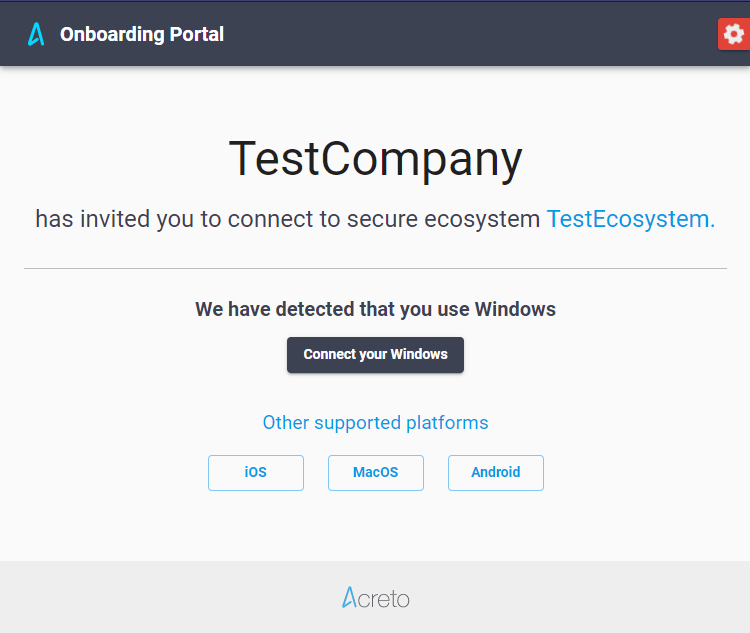
- Website should recognize the platform/operating system you’re using and propose a proper connection route. If the platform isn’t recognized, you can choose another using the other supported platforms button.
Onboarding steps via various operating systems can be found in the below articles:
Onboard on Android
Overview
This article will help you connect your Android device to an Acreto Ecosystem.
If you open the Acreto invitation on an Android device, the onboarding page should recognize that you’re using an Android and guide you through the proper onboarding process.
Follow the steps below to secure your internet connection via Android.
How-To
To connect your device:
- Click on the Connect your Android button on the invitation page.
- The Onboarding Portal allows you to download elements necessary to start using Acreto:
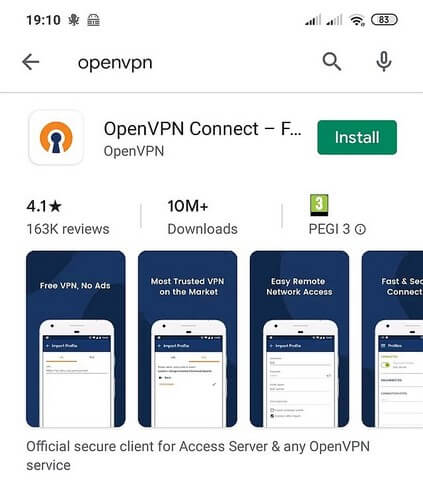
- Install our client app from Google Play - this button allows you to download the OpenVPN for the Android app.
- Install Profile - this button allows you to download the configuration from the OpenVPN app.
- Click on the Google Play link and install OpenVPN for Android - wait until the installation is complete.
- Go back to the Web Browser.
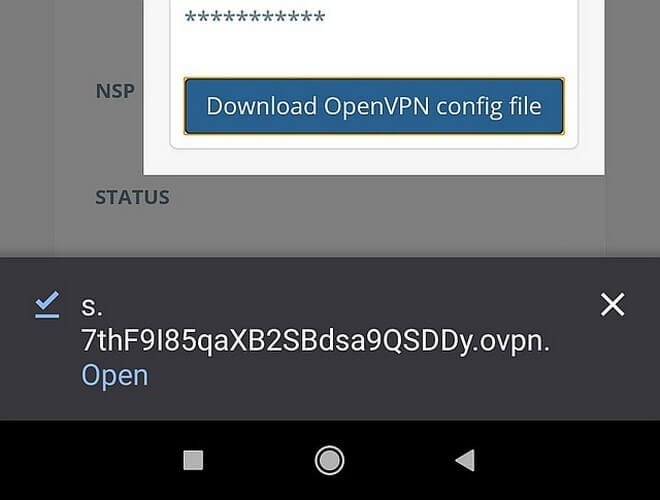
- Click on the Install Profile button to download the configuration file.
- When the download finishes, select the Open option to launch the downloaded file.
- OpenVPN for Android should automatically import this file and prompt you to choose a name for a new connection (you can enter a new name or leave as default). Select ✔ to accept.
- On the Profile list, click on the newly added configuration.
- Fill the modal window with the Username/Password that you use within your organization (LDAP or Octa credentials).
- Wait until a connection is established and confirm that your connection is secured.
- Success, you are now connected to Acreto!
Onboard on iOS
Overview
This article will help you to connect your iOS device to an Acreto Ecosystem.
If you open the Acreto invitation on an iOS device, the onboarding page should recognize that you’re using an iOS device and guide you through the proper onboarding process.
Follow the steps below to secure your internet connection via iOS.
How-To
To connect your device:
- Click on the Connect your iOS button on the invitation page.
- The Onboarding Portal allows you to download elements necessary to start using Acreto:
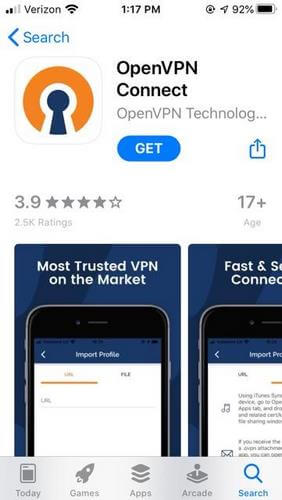
- Install our client app from App Store - this button allows you to download the OpenVPN Connect app.
- Install Profile - this button allows you to download the configuration from the OpenVPN app.
- Click on the App Store link and install OpenVPN Connect - wait until the installation is complete.
- Go back to the Web Browser.
- Click on the Install Profile button to download the configuration file.
- When the download finishes, open the downloaded file - click the Open option.
- OpenVPN Connect should automatically import the configuration file and prompt you to choose a name for a new connection (you can enter a new name or leave as default). Select ✔ to accept.
- On the Profile list, click on the newly added configuration.
- Fill the modal window with the Username/Password that you use within your organization (LDAP or Octa credentials).
- Wait until a connection is established and confirm that your connection is secured.
- Success, you are now connected to Acreto!
Onboard on MacOS
Overview
This article will help you to connect your MacOS device to an Acreto Ecosystem.
If you open the Acreto invitation on a macOS device, the onboarding page should recognize that you’re using a macOS device and guide you through the proper onboarding process.
Follow the steps below to secure your internet connection via MacOS.
How-To
To connect your device:
- Click on the Connect your macOS button on the invitation page.
- The Onboarding Portal allows you to download elements necessary to start using Acreto:
- Download Client - this button allows you to download Tunnelblick.
- Install Profile - this button allows you to download the configuration from OpenVPN.
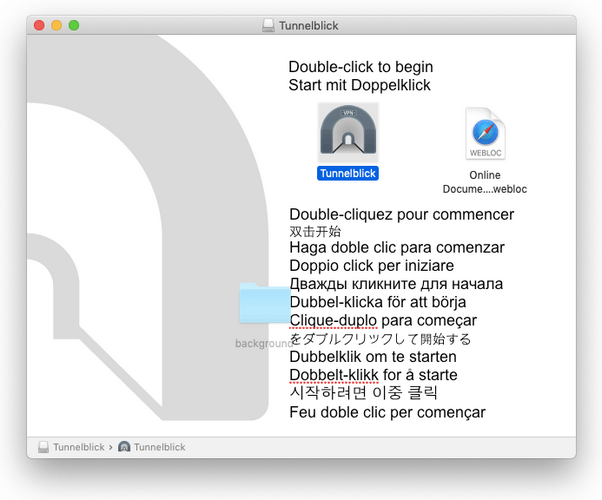
- Install Tunnelblick - double click on the downloaded installation file and proceed with an installation wizard.
- Run Tunnelblick.
- Double-click on the Tunnelblick icon in the Tunnelblick disk image Finder window.
- On the modal window, select file with the configuration downloaded in step 2.2.
- Click connect option.
- Fill modal window with Username/Password that you are using in your organization (LDAP or Octa credentials).
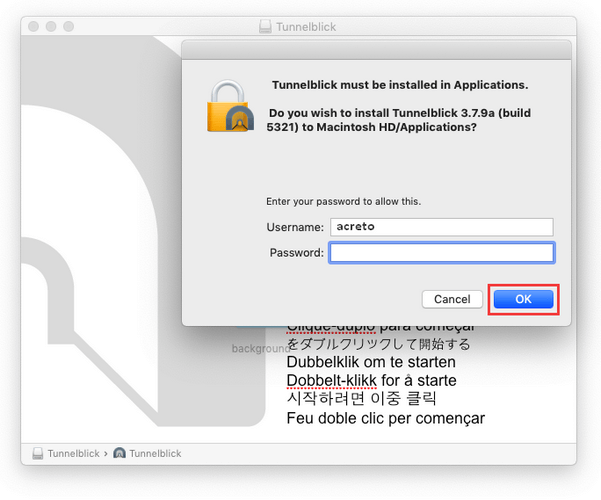
- Once the installation is complete, you will see a pop-up notification:
Installation succeeded. Tunnelblick was successfully installed. Do you wish to launch Tunnelblick now? (An administrator username and password will be required so Tunnelblick can be secured).
Click Launch
- Wait until a connection is established and confirm that your connection is secured.
- Success, you are now connected to Acreto!
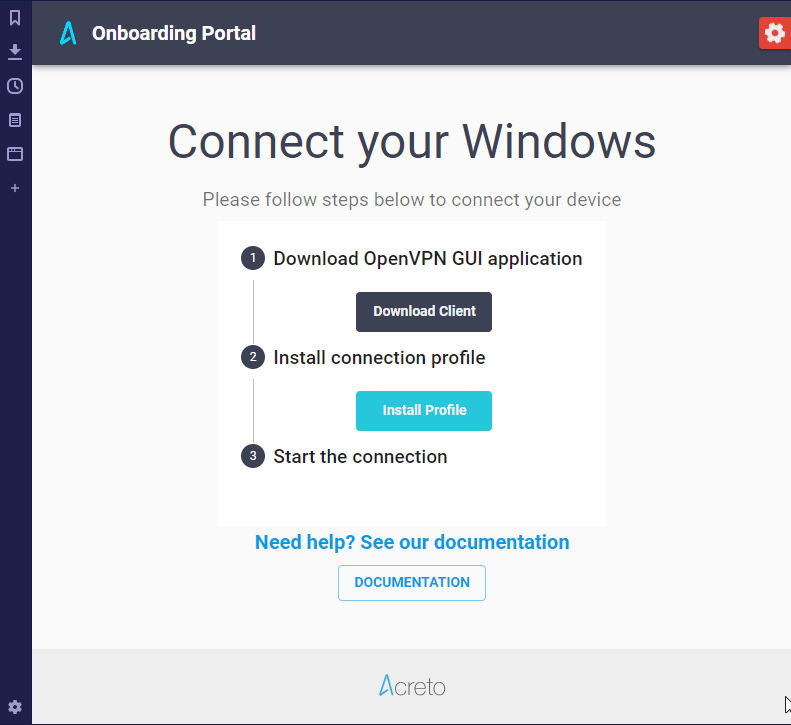
Onboard on Windows
Overview
This article will help you to connect your Windows device to an Acreto Ecosystem.
If you open the Acreto invitation on a Windows device, the onboarding page should recognize that you’re using a Windows device and guide you through the proper onboarding process.
Follow the steps below to secure your internet connection via Windows.
How-To
To connect your device:
- Click on the Connect your Windows button on the invitation page.
- The Onboarding Portal allows you to download elements necessary to start using Acreto:
- Download Client - this button allows you to download the OpenVPN GUI client.
- Install Profile - this button allows you to download the configuration from OpenVPN.
Download both of those files.
- Install OpenVPN - double click on the downloaded installation file and proceed with an installation wizard.
- Run OpenVPN - search for the new icon, it should be visible on the Windows tray.
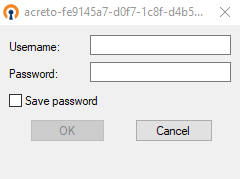
- Right click on this OpenVPN icon and select the Import file… option.
- On the modal window, select file with the configuration downloaded in step 2.2.
- Right-click the tray icon once again - a new profile should be added. Select this profile and choose Connect from the submenu.
- Fill the modal window with the Username/Password that you are using in your organization (LDAP or Octa credentials).
- Wait until a connection is established and confirm that your connection is secured.
- Success, you are now connected to Acreto!