Subsections of Acreto Connect Client - administrator guide
Connect the Thing with Acreto Connect Client
Before You Start
Overview
In this article, you’ll learn how to create and connect Thing to the Acreto ecosystem.
This Use Case allows you to securely connect client (PC, laptop, smartphone) to the office ecosystem.
- Configure the Thing
- Install Acreto Connect Client
Prerequisites
To connect your Thing to the Ecosystem, you will need:
- Existing Acrereto Ecosystem, if you don’t have one learn how to create it.
- Access to Acreto Wedge.
- A device that you want to connect to the Ecosystem.
How To
- Log in to the Wedge
- Choose your Ecosystem.
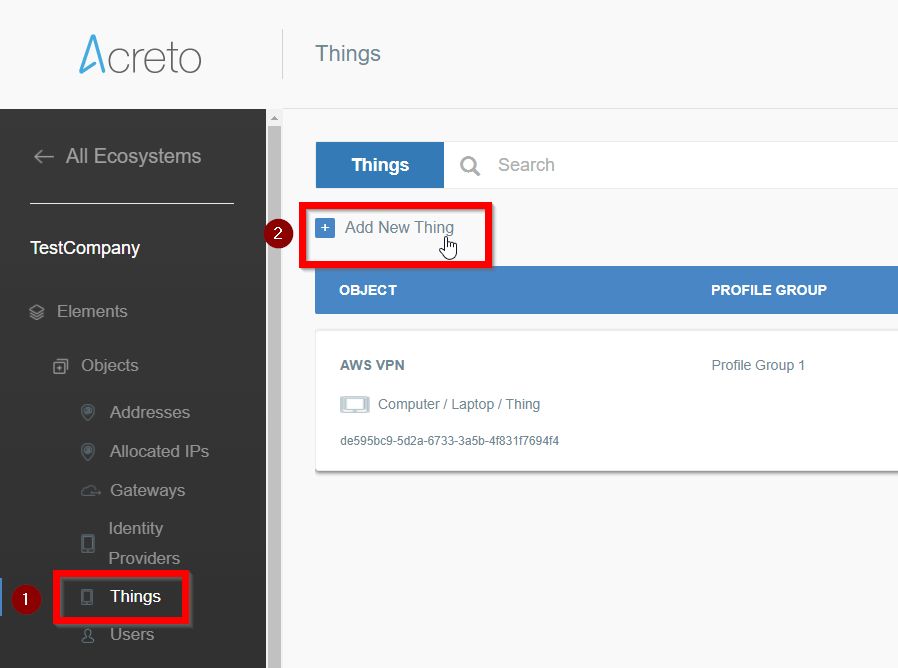
- From the left menu choose Objects > Things (1) and click on this option.
- In the Things panel click on the + Add New Thing button (2)
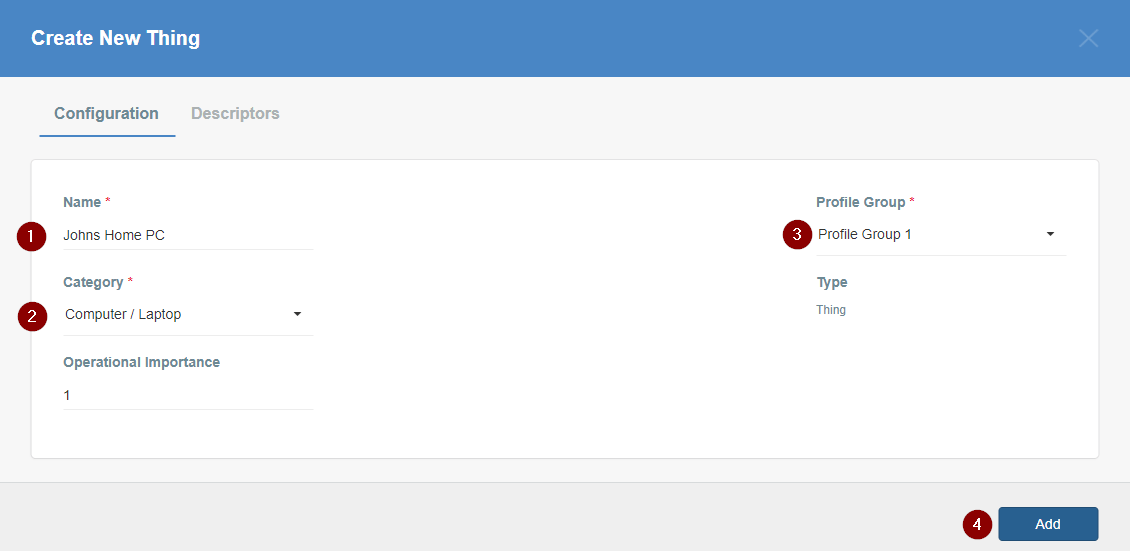
- Fill the form:
- Input the descriptive name of the device.
- Choose the category of the device.
- Choose the Profile Group for the device if you have more than one group. Otherwise, leave the default value.
- Save the form to add the Thing.
- The newly created Thing is now available on the list.
- Click on the Apply changes button on the top of the screen to commit a new thing to the Ecosystem.
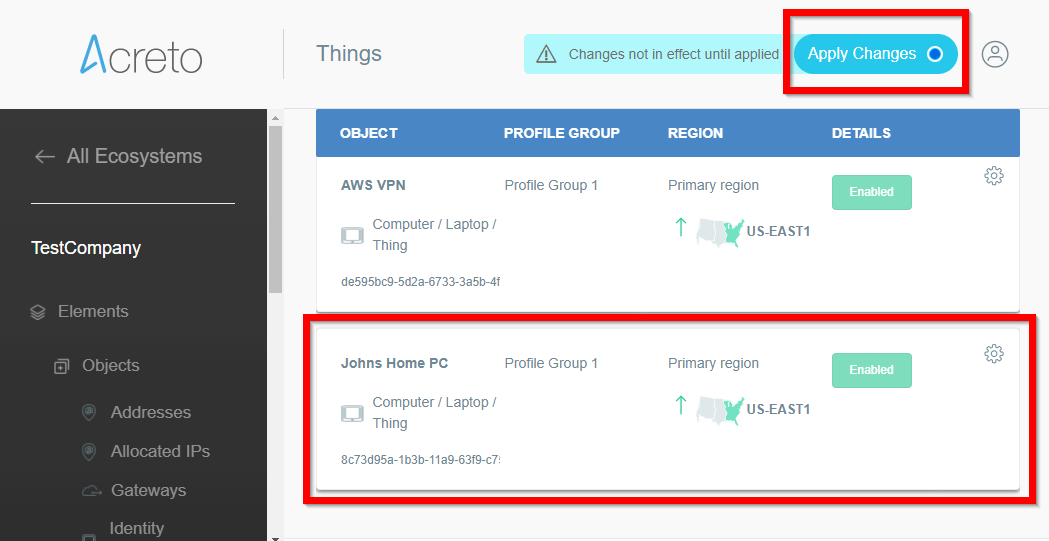
- Wait for the changes to be applied
- Click on the name of created Thing to see its details.
- On the right part of the details screen you may see Configuration Options - find the right configuration file for your device and copy the link by clicking on the icon.

Install Acreto Connect Client
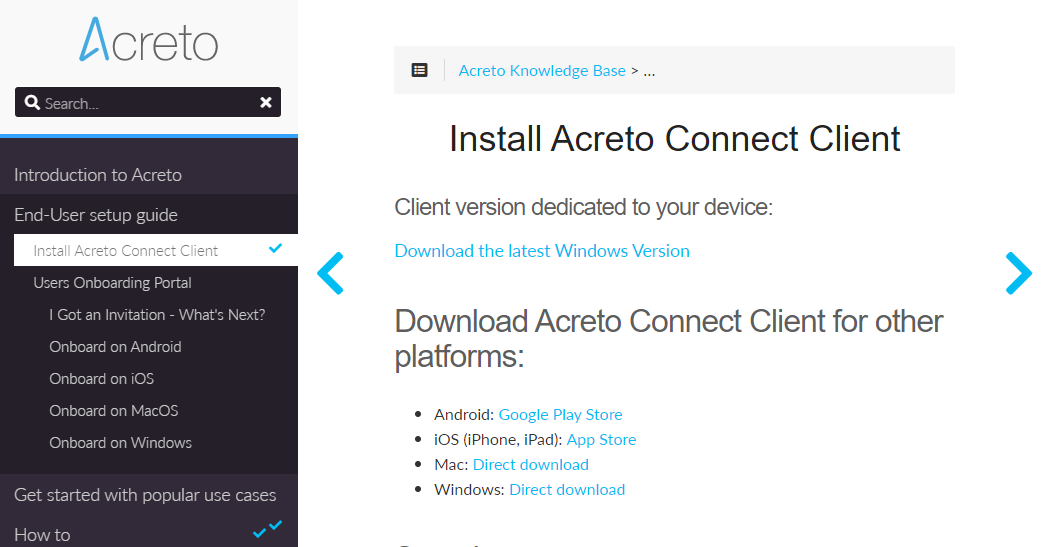
At first, you need to download and install Acreto Connect Client - a small application that allows you to connect to the Acreto ecosystem.
- Open kb.acreto.net/client on the device which you want to connect to the Ecosystem.
- Download the ACC version for your operating system - this page tries to recognize the type of your device and allows you to download the dedicated version.
- When the installation file is downloaded, install the Acreto Connect Client.
- Run Acreto Connect Client - the interface of the application is the same on all platforms. You should get a screen similar to this shown below:
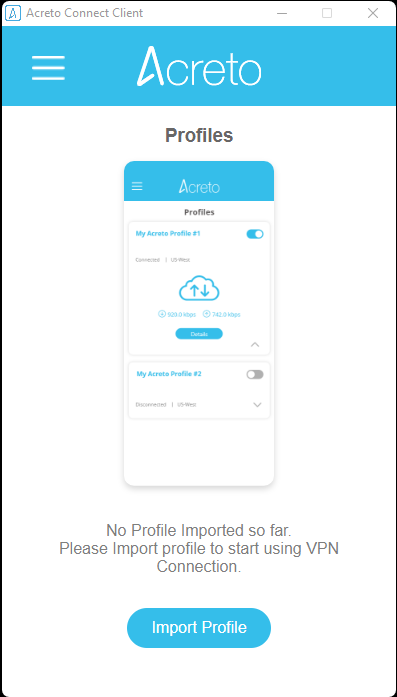
- Click on the Import Profile button.
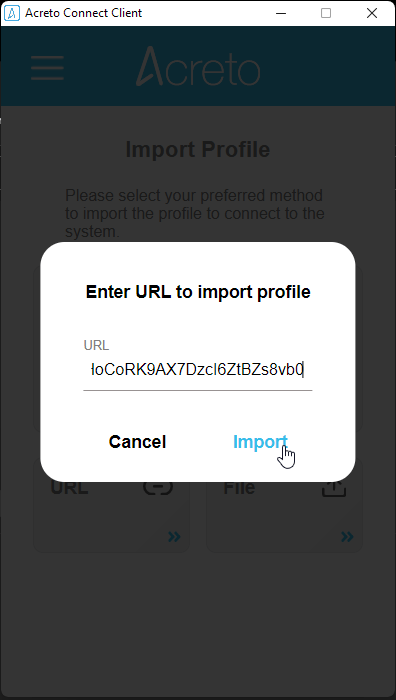
- You will see three options to connect import the profile: Code, URL, and the file. In this case, we will use the URL generated in the previous step.
- Paste the configuration link from the Wedge generated in the previous step and click on the Import button
- The Acreto Connect Client will import the profile and atomically connect your device to the Ecosystem.

Your device is now connected to the Ecosystem!
Summary
Acreto Connect Client allows connecting your Thing to the Ecosystem. This method works on every platform and it’s easy to understand for Users.
Please don’t forget to create Security Policy - Policies to allow Outbound traffic for your Thing(s) to connect to the Internet, or to the other devices within your Ecosystem.
VPN Start Before Logon (SBL)
Before You Start
Overview
Available only for Windows platforms, the Acreto Connect Client Start Before Logon (SBL) establishes the VPN connection before logging onto Windows. The purpose of this feature is while the computer is off the office or when the user is logging onto a new computer remotely. SBL allows remote users to log to Windows using Domain Controlled credentials because the VPN tunnel to the Data-Center is always on.
Note
This feature is available only for version 2.4.0 and newer. Update your ACC if you want to use this option.
Prerequisites
To connect your Windows device to the Ecosystem on the log on you will need:
- Existing Acreto Ecosystem, if you don’t have one learn how to create it.
- Access to Acreto Portal.
- A Windows device that you want to connect to the Ecosystem.
- Acreto Connect Client (minimal version 2.4.0).
How To
Install Acreto Connect Client
At first, you need to download and install the Acreto Connect Client.
-
Go to the download page to get Acreto Connect Client.
-
Install the ACC
-
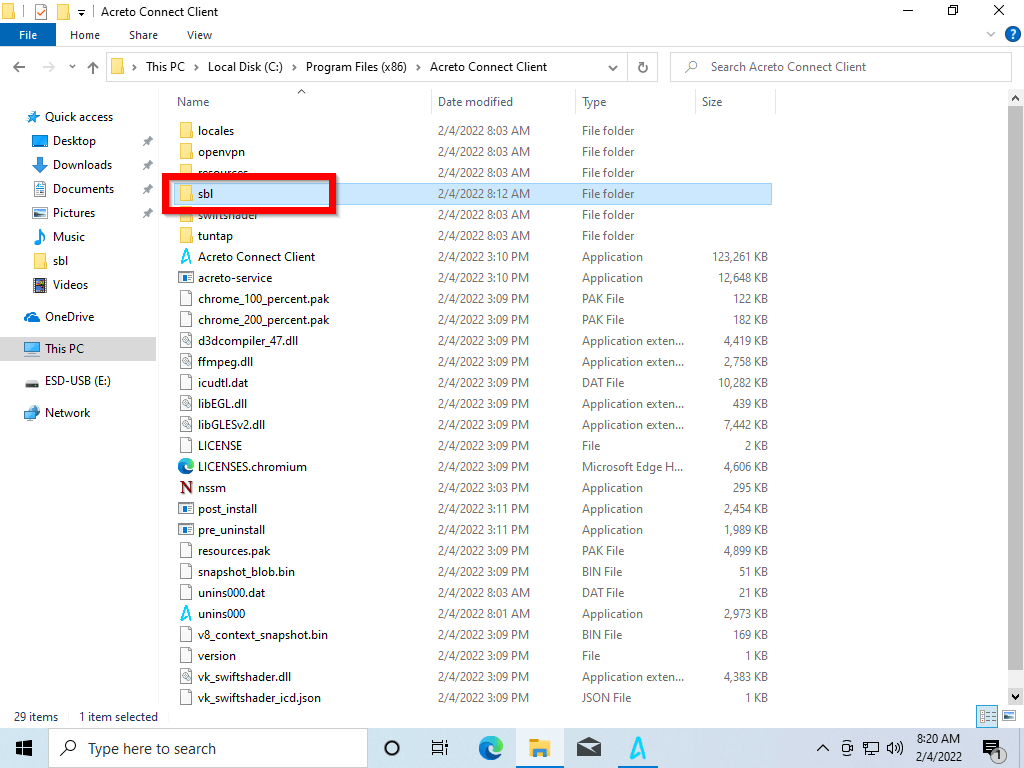
Go to
C:\Program Files (x86)\Acreto Connect Client
to confirm that the sbl directory exists.
-
Run the acc_sbl.reg file - it will add some information into your system registry.
-
Open the Powers Shell with Administrator privileges and run:
Set-ExecutionPolicy -ExecutionPolicy RemoteSigned -Scope LocalMachine
Answer “Y” for the question in PowerShell, then run:
cd "C:\Program Files (x86)\Acreto Connect Client\sbl"
.\sbl.ps1
You will receive confirmation of Acreto-SBL Service creation.
SBL feature will run any profile that you will place in C:\Program Files (x86)\Acreto Connect Client\sbl.
-
Create the profile in Acreto Portal.
-
Download the profile and place it in C:\Program Files (x86)\Acreto Connect Client\sbl directory.
-
If the profile requires authorization:
-
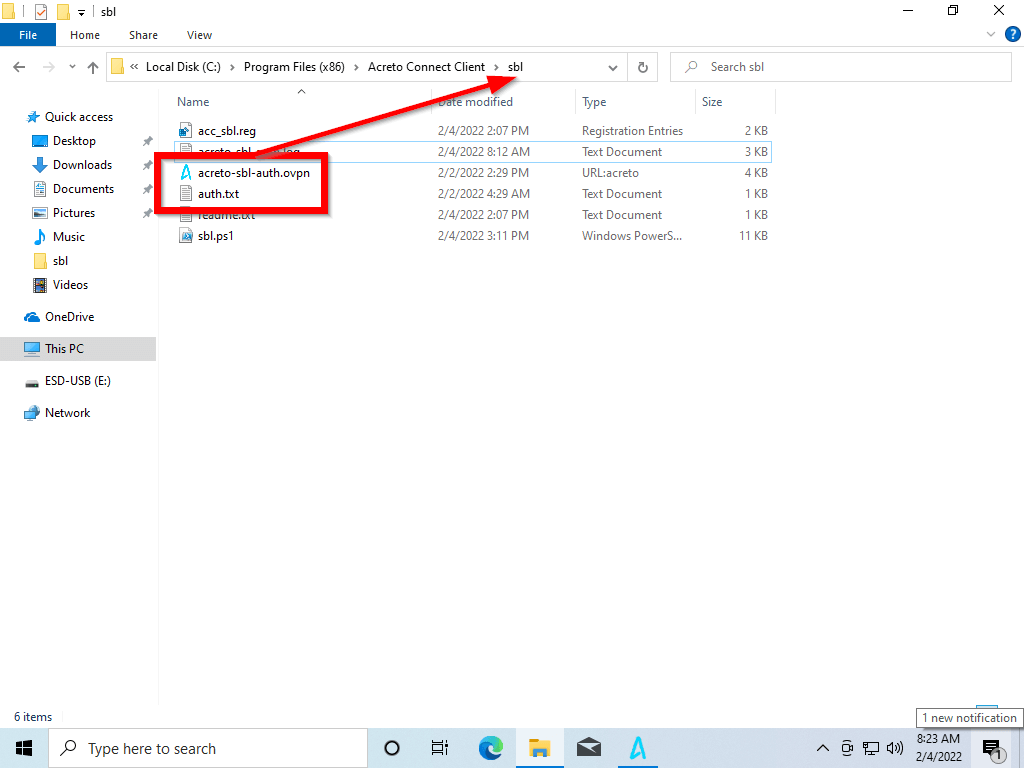
create auth.txt file and provide the username and password in form:
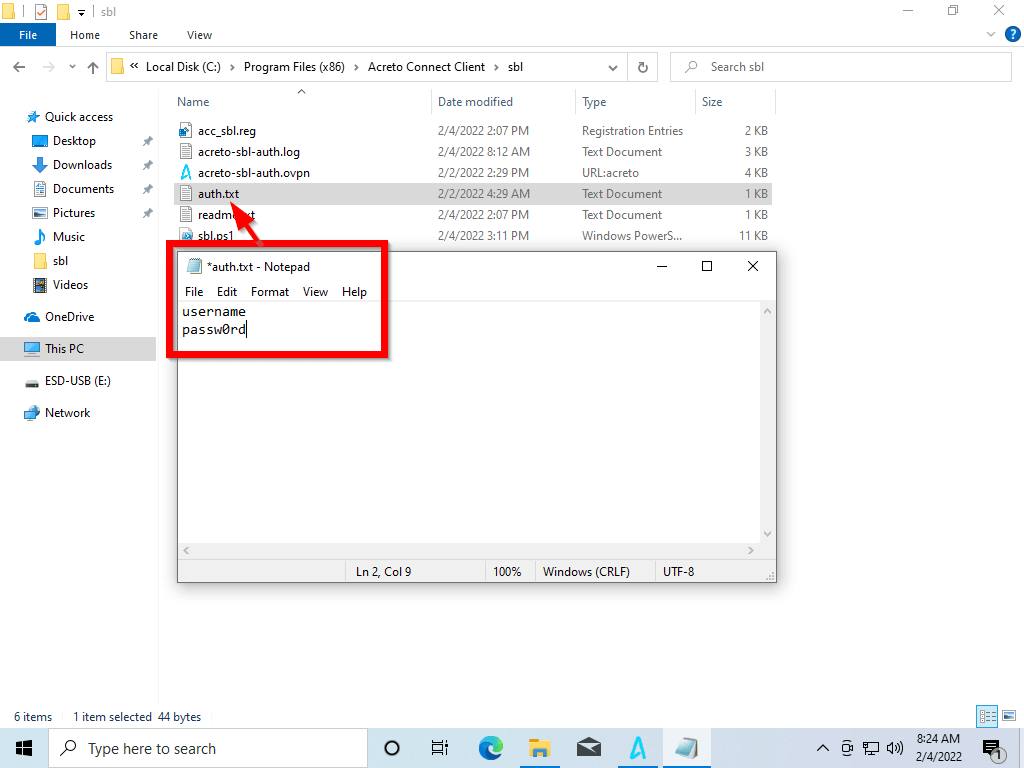
-
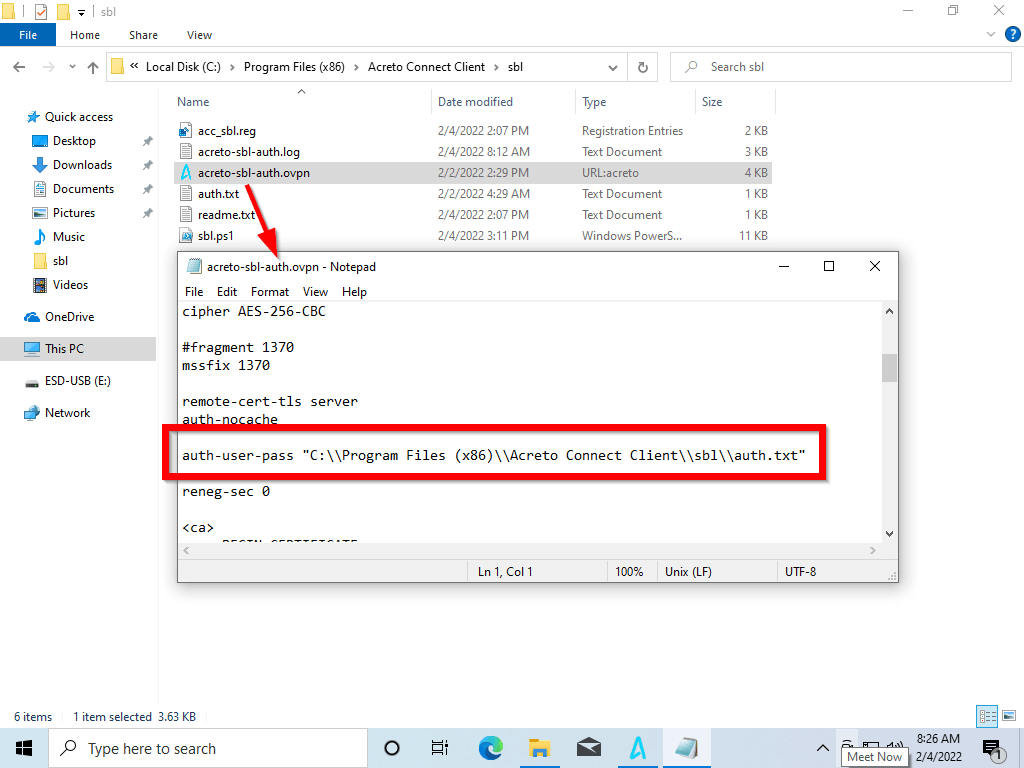
Modify your profile - search for the auth-user-pass line and change it to
auth-user-pass "C:\\Program Files (x86)\\Acreto Connect Client\\sbl\\auth.txt"
Verification
To verify that the feature works correctly, perform the test:
-
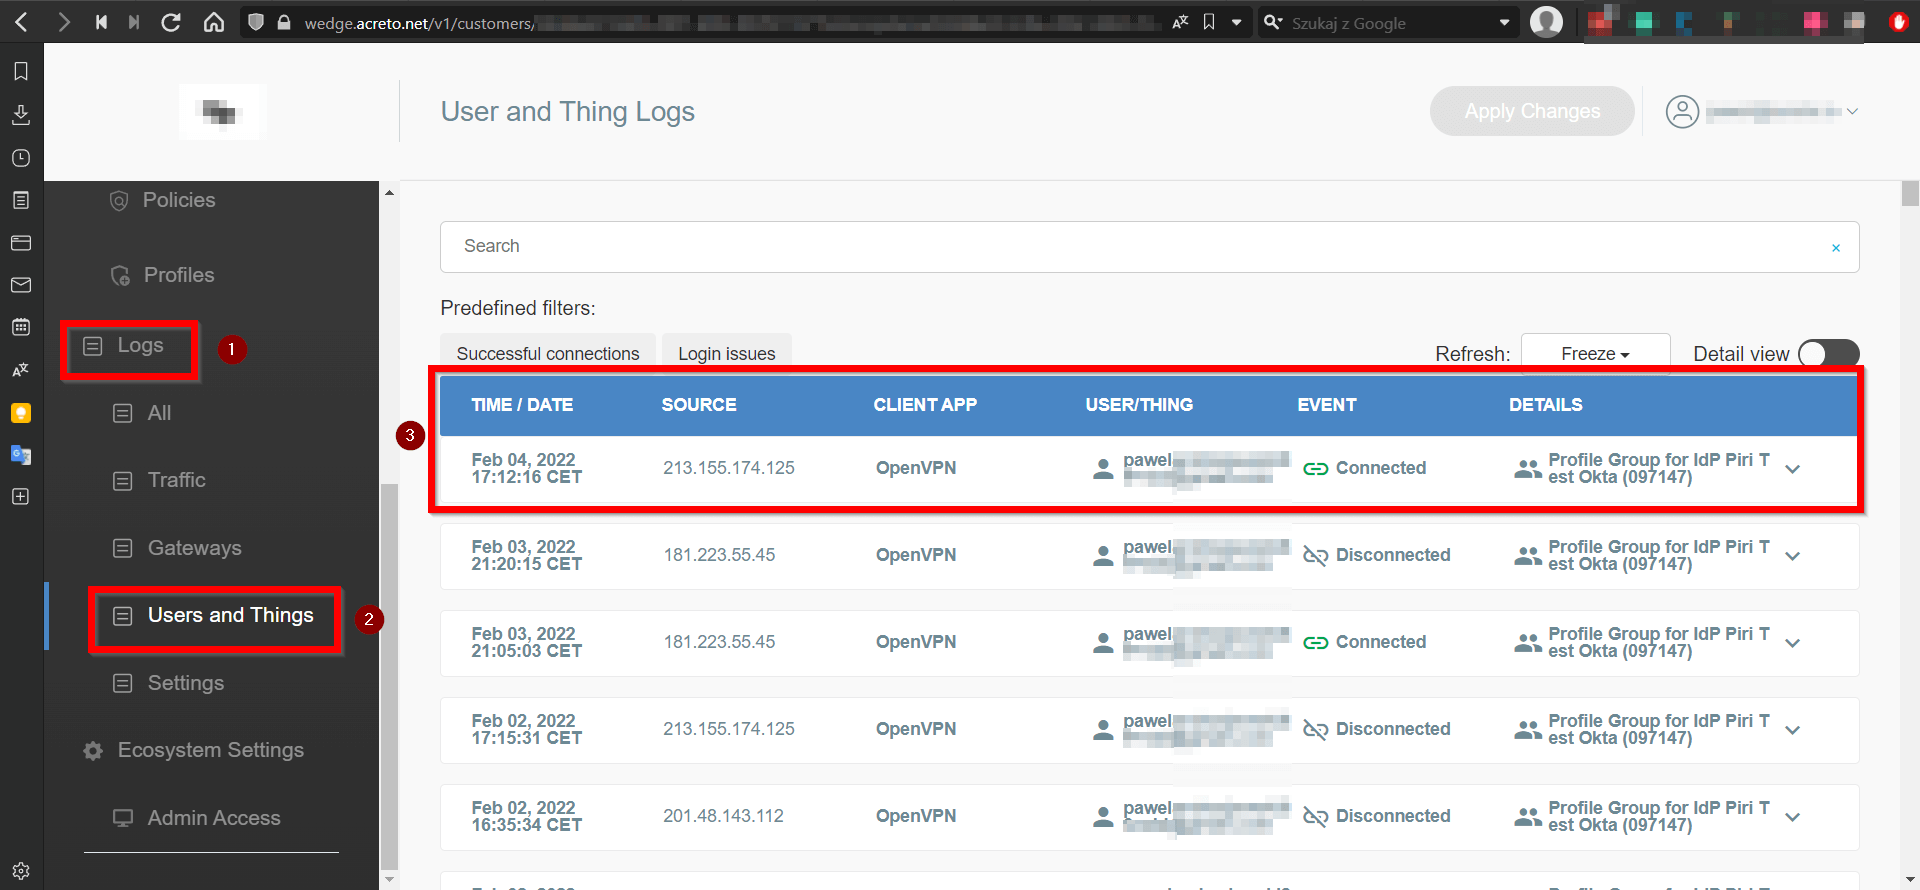
Verify using Acreto Portal:
-
Login into Acreto Portal.
-
Choose the proper Ecosystem.
-
From the left menu, choose Logs(1) > User and Things(2).
-
Set Refresh rate to 5S.
-
Restart the device with the SBL profile.
-
Wait for the login screen on the tested device (do not log in) and the logs, where you should receive information that the profile you placed in the config directory is connected to your Ecosystem (3).
-
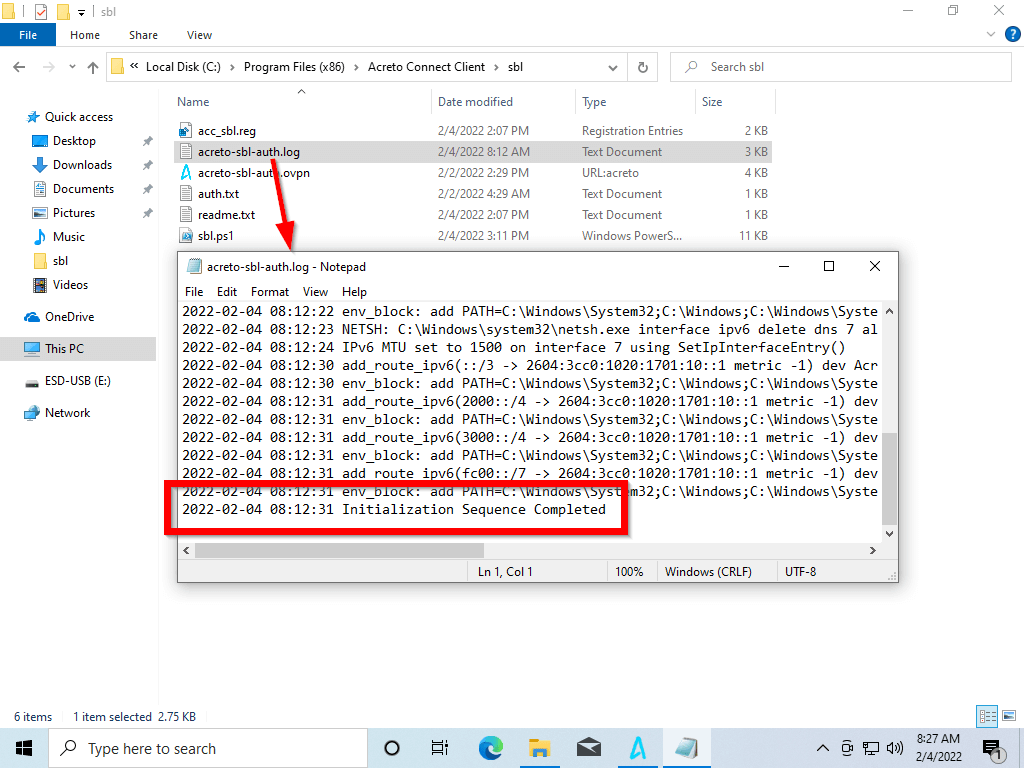
Verify using logs:
-
Restart the device with the SBL profile.
-
Wait for a few seconds on the logon screen, then log in.
-
Go to C:\Program Files (x86)\Acreto Connect Client\sbl
-
Find the NAME OF YOUR PROFILE.log and open it to check the logs.
Limitation
We highly recommend using the Split-tunnel profiles.
Once SBL starts the connection User will not be able to disconnect it. If you use the Full-tunnel profile, you will not connect using other full-tunnel profiles.
Summary
Acreto Connect Client allows connecting your Windows device to the Acreto Ecosystem using the SBL feature.
Deep Link
Deep link
To import a profile directly to app from a web browser link, deep link is avalaible with the pattern acreto://
Import Profile using URL
To import from a URL link use the format acreto://import-profile?url=<URL_TO_PROFILE>
Example:
acreto://import-profile?url=https://api-is-rock-solid.acreto.net/v2/tlsvpn/config/openvpn-udp/code/123456
Import Profile using Ecosystem Code
To import from a invite Code use the format acreto://import-profile?code=<6_DIGIT_CODE>
Example:
acreto://import-profile?code=123456
Webserver configuration
To make sure that the VPN profile is opened automatically by the Acreto Connect Client, make sure that the webserver that hosts the .ovpn file sends the correct mime media type in the response HTTP header.
If the header is missing, the .ovpn file may be opened as a text file on Android and iOS devices.
Apache
On Apache servers update mime.conf file and restart the server:
sudo echo "        AddType application/x-openvpn-profile .ovpn" >> /etc/apache2/mods-enabled/mime.conf
sudo systemctl restart apache2
NGINX configuration
On Nginx servers update mime.types file and restart the server:
Edit mime.types config file with your favorite text editor:
nano /etc/nginx/mime.types
Add new mime type
application/x-openvpn-profile .ovpn
Restart the server
sudo systemctl reload nginx
Test
Use any Android or iOS device with Acreto Connect Client installed and tap on the deep link based on your server.
If Acreto Connect Client appeared after the click and the VPN profile is on the list everything works properly.
Install ACC from Windows Command Line
Overview
If your company manages the software using the Active Directory Group Policy Object or tools like Syxsense - ACC is ready to be installed by CMD. This solution lets you quickly onboard your entire team to the Acreto Ecosystem.
Installation and configuration of ACC with the GPO Rules is described in a separate article.
Install and Update Acreto Connect Client with CMD
Acreto Connect Client installer supports parameters that allow the install of software without user action:
Powershell command:
Start-Process ".\Acreto-Connect-Client-v2.9.6.exe" -ArgumentList '/VERYSILENT /NORESTART /SUPPRESSMSGBOXES'
Windows CMD command:
.\Acreto-Connect-Client-v2.9.6.exe /VERYSILENT /NORESTART /SUPPRESSMSGBOXES
Parameters used in install command:
/VERYSILENT - instructs to proceed with installation in the background - no windows will be shown on the system GUI. Alternatively, it may be replaced by /SILENT - in this case, the installation will only show the progress window./NORESTART - disables installer option to restart user device after installation - this option is highly recommended./SUPPRESSMSGBOXES - instructs to suppress any message boxes that appear at installation time and proceed with default options. It only has an effect when combined with /SILENT or /VERYSILENT.
If you need more options, please follow the official documentation for the installer.
Next step
The commands described above can be used to install or upgrade ACC. You can use them in your custom scripts or software management tool.
Install ACC with Group Policy Object
Overview
If your company manages the users by the Active Directory, it’s possible to provide and install Acreto Connect Client using Group Policy Object. ACC is ready to be installed and configured by GPO rules. This solution allows you to quickly onboard the whole of your team to the Acreto Ecosystem.
This article consists of two parts:
- Install Acreto Connect Client with Group Policy Object
- Importing Profile into Acreto Connect Client with Group Policy Object
Prerequisites
Note
This feature is available only for version 2.4.3 and newer. Update your ACC if you want to use this option.
To complete these tutorial steps, the following items are required:
- Windows Server machine
- Basic knowledge of Windows Server configuration
- Active Directory setup experience
Install Acreto Connect Client with Group Policy Object
Acreto Connect Client uses *.EXE installer - this means that you cant use the default way of software installation for GPOs. To install ACC you need to create a Scheduled Task to run the installation script. Scheduler task allows to run the script and install software with administrator privileges. What’s more important - installation is completely invisible for the user.
How to
-
First, create the shared folder that will be available for the users.
-
Download the last version of Acreto Connect Client for Windows.
1.Rename the installer to Acreto-Connect-Client.exe and place it in a shared folder. Installation script also takes care of the updates - it will read the installation version and compare it to the one existing on the users device - if the available version is newer, it will install it.
-
On the domain controller server, create an acreto_install.ps1 file with the below content:
# ADD YOUR VALUES HERE
$InstallPath = 'C:\Program Files (x86)\Acreto Connect Client' #local installation path
$InstallerFile = '\\SERVER\acc\Acreto-Connect-Client.exe' #ACC installer path shared in internal network
# END

IF (Test-Path -Path $InstallPath) {
#if path exists then...
$InstallPathExe = 'C:\Program Files (x86)\Acreto Connect Client\Acreto Connect Client.exe' #local installation binary
$update = ((Get-Item $InstallerFile).VersionInfo.ProductVersion) #Version of ACC available on server
$current = ((Get-Item $InstallPathExe).VersionInfo.ProductVersion) #Version of ACC available on server

IF ([System.Version]"$update" -gt [System.Version]"$current"){
   #if update is available than install
   & "$InstallerFile" /qn /SILENT /norestart INSTALLSTARTMENUSHORTCUTS=1 DISABLEADVTSHORTCUTS=0
   & 'C:\Program Files (x86)\Acreto Connect Client\post_install.exe'-y /qn /SILENT /norestart
} ELSE {
   #If thers no update, exit.
   EXIT
}
} ELSE {
& "$InstallerFile" /qn /SILENT /norestart INSTALLSTARTMENUSHORTCUTS=1 DISABLEADVTSHORTCUTS=0
& 'C:\Program Files (x86)\Acreto Connect Client\post_install.exe'-y /qn /SILENT /norestart
}
-
In Group Policy Management, create a new Group Policy under your domain.
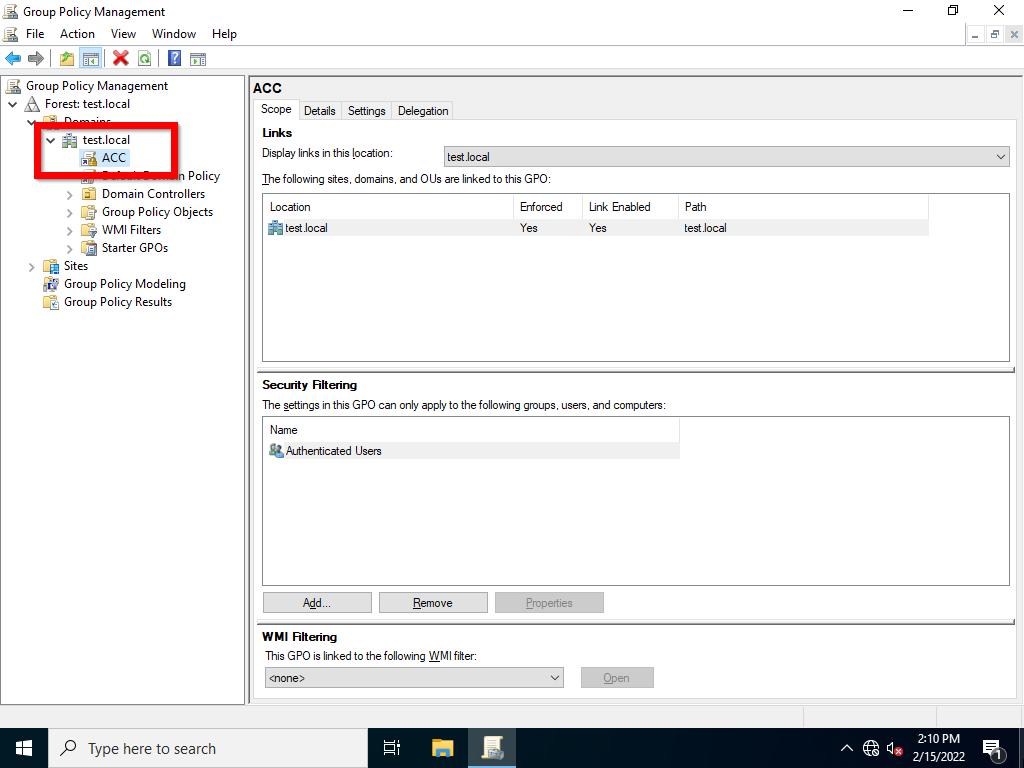
-
Edit the GPO by right-clicking on it and select Edit.
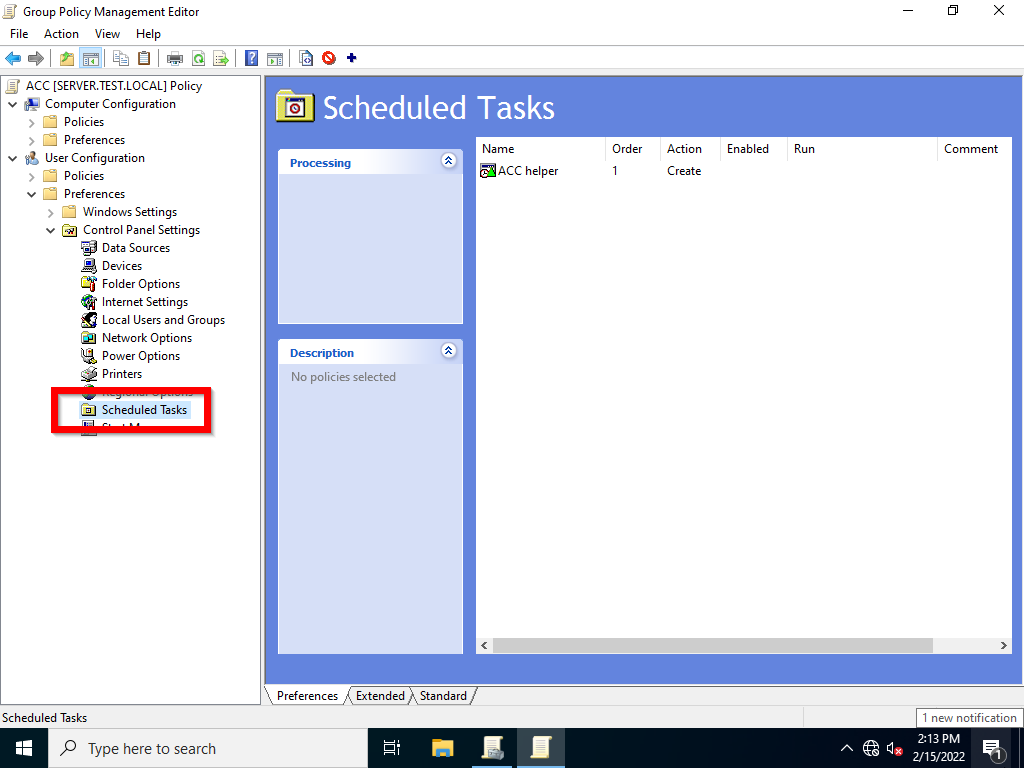
-
Navigate to User Configuration > Preferences > Control Panel Settings > Scheduled Tasks
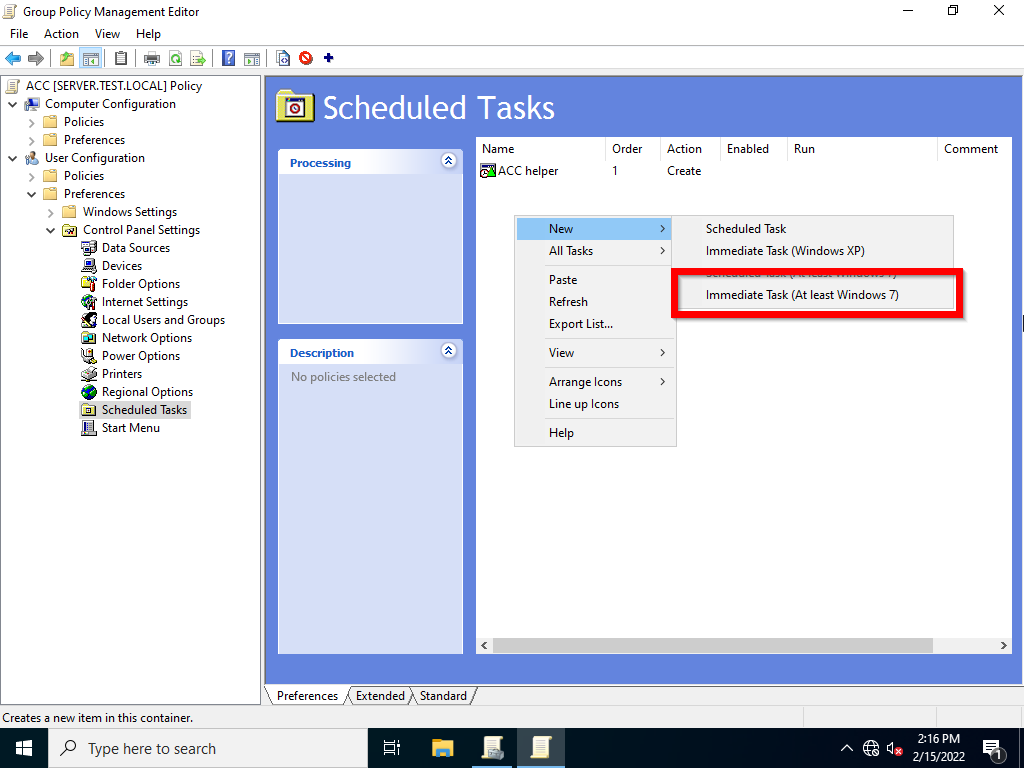
-
Click Right Mouse Button on Scheduled Task panel and choose New > Immediate Task (At least Windows 7)
-
In task creation widow set:
-
Name: ACC installer
-
When running the task, use the following user account: click on Change User or Group button and inpute SYSTEM as a user and click on Check names button. As a Result you should recive the NT AUTHORITY\System.
-
Check: Run whether user is logged or not
-
Check: Run with highest privileges
-
Configure for: Windows 7, [..]

-
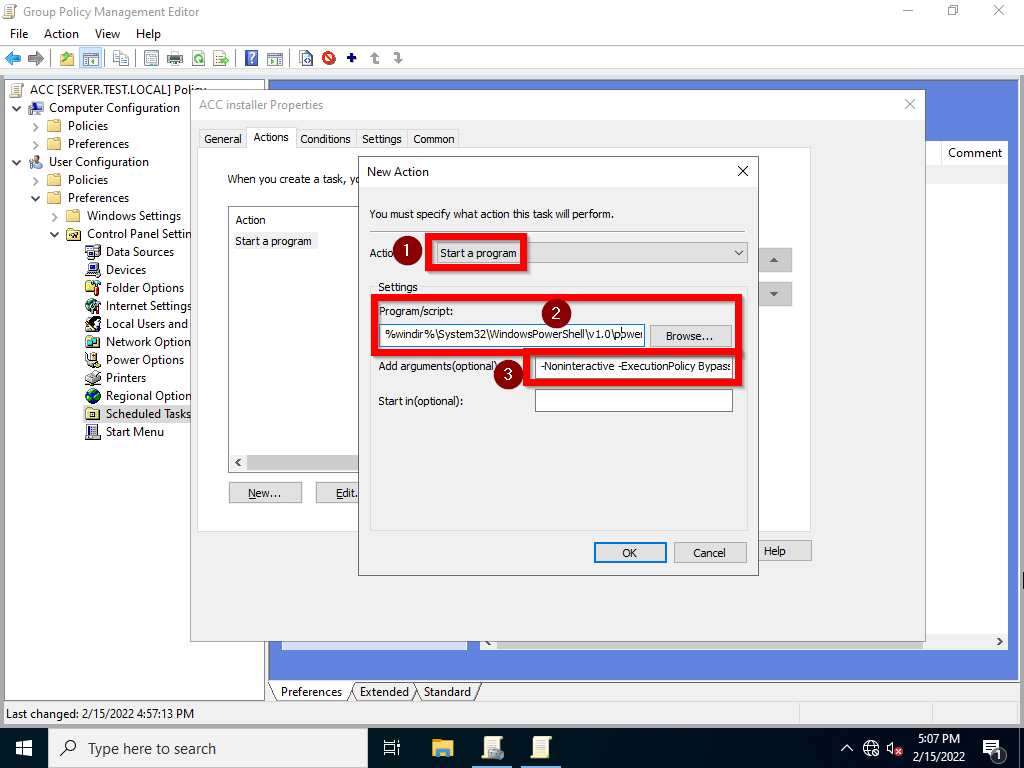
Go to Actions tab and click on New… tab
-
Action: Start a program
-
Program script: %windir%\System32\WindowsPowerShell\v1.0\powershell.exe - path to the PowerShell
-
Add arguments: -Noninteractive -ExecutionPolicy Bypass –Noprofile -file PATH-TO-acreto_install.ps1 - make sure that path to script will be available throught the network.
-
Click Ok butten and the sace whole task.
Result
As a result, the scheduled task will be run regularly on users devices and run the installer script. Installer script working with system privileges will check if ACC needs to be installed or updated.
Importing Profile into Acreto Connect Client with Group Policy Object
Acreto Connect Client is already installed on the user’s computer. To establish a connection the ACC required a profile with configuration. Create the policies to download the correct Profile for ACC.
How to
-
Add the script to import the profile, navigate to User Configuration > Policies > Windows Settings > Scripts ( Logon / Logoff ):
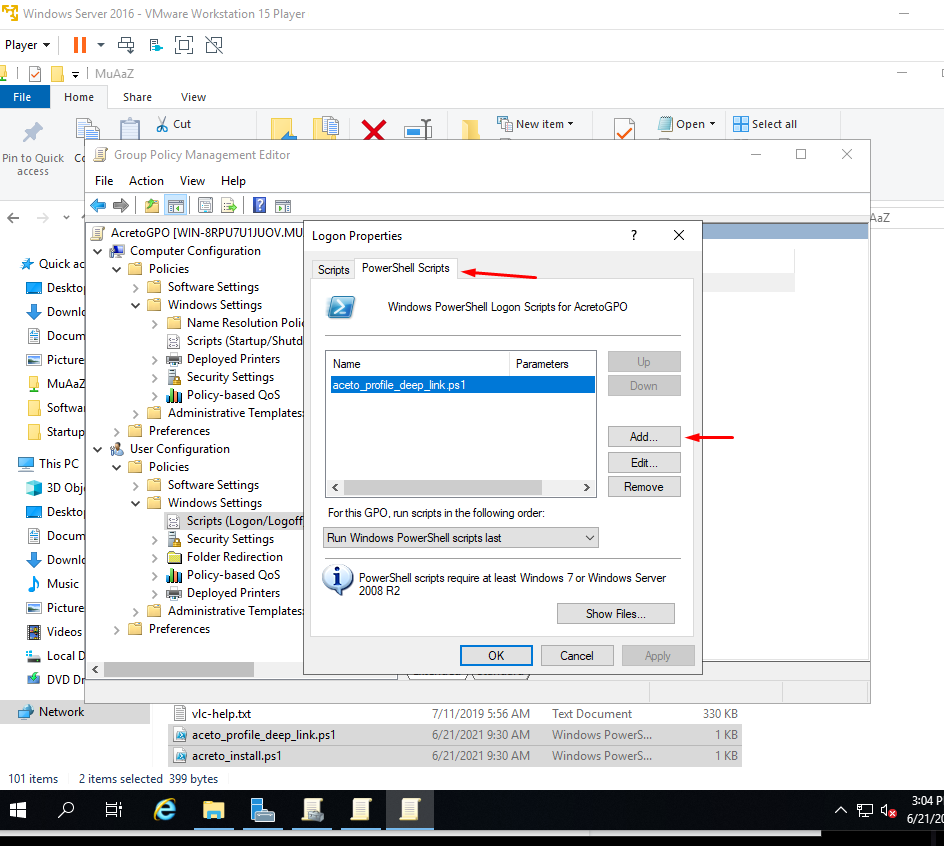
Copy and paste the below code into acreto_profile_deep_link.ps1:
Start-Process "acreto://import-profile?code=123456"
Note
This action needs to be made on user log-on because it required Internet access to download the profile data.
-
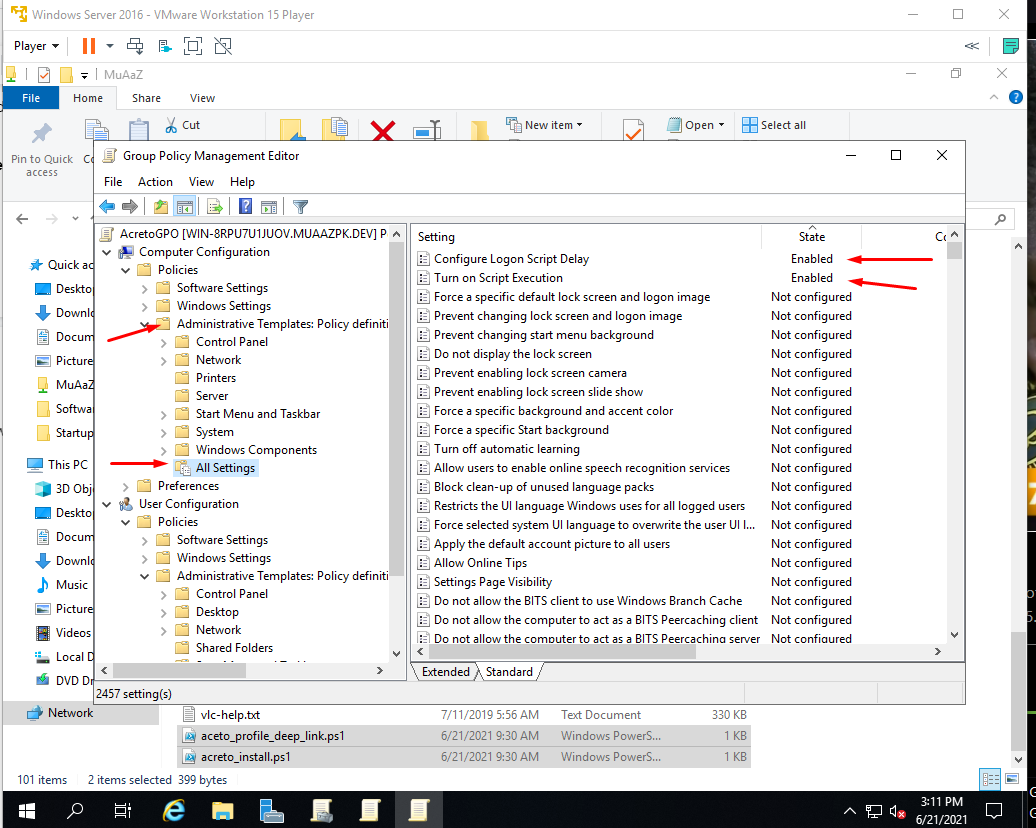
Navigate to Computer Configuration > Policies > Administrative Templates > All Settings
-
Do the following change under settings:
- Configure Logon Script Delay: Enabled
- Turn on Script Execution: Enabled
-
Double click on Turn on Script Execution and modify its setting. Make sure that the Execution Policy is set to Allow all scripts. If you want to run only signed scripts it is also possible, but you will need to sign in with your certificate before running it.
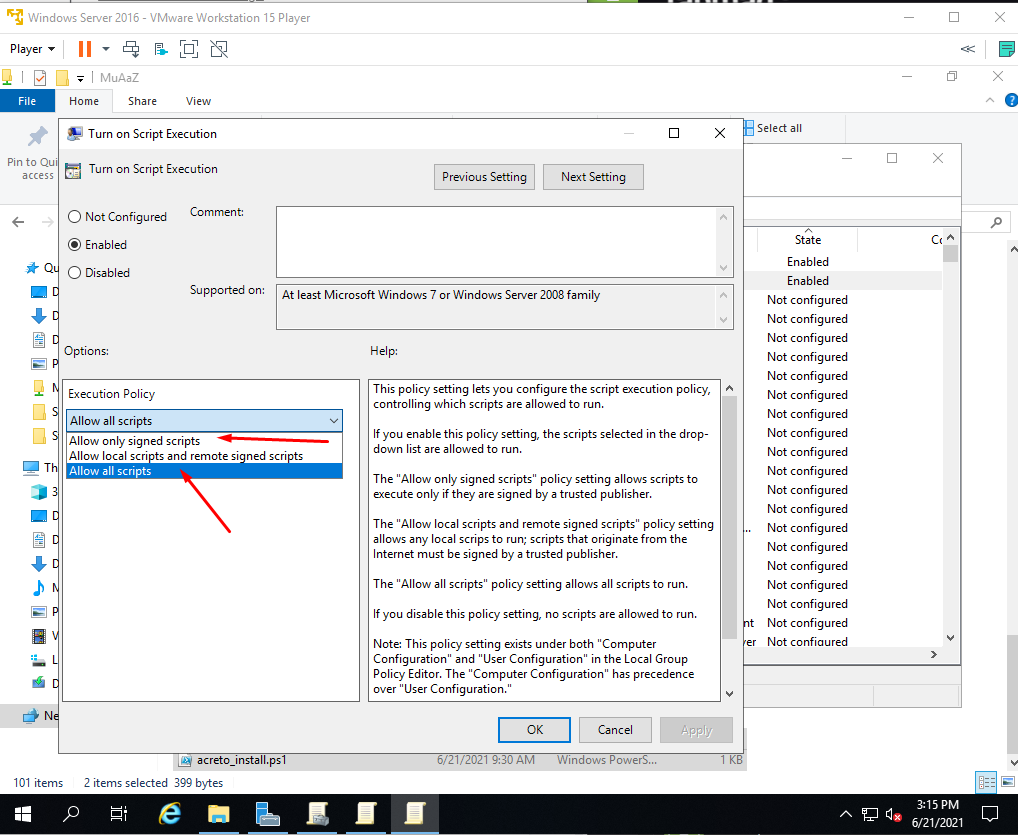
This script will be executed on the user login. ACC import profile by the deep link. No user actions are required.
Next step
All computers should be configured to use Acreto Connect Client. The user needs to use their credentials to login into the Ecosystem (if the profile needs that).
If users were imported from the AD the credential should be the same as stored in AD.